Canon 16-35mm F4 IS Lens Review
The Best Ultrawide Lens this Generation Will See

Photo courtesy of me

Canon 16-35mm F4 IS  lens as seen attached to my Canon EOS M3
 with Canon EF to EF-M adapter
lens as seen attached to my Canon EOS M3 with Canon EF to EF-M adapter
77MM filters
616 grams (very light)
Weathersealed
Image Stabilized
I've been a Canon DSLR shooter since 2005. I've used all the ultrawides since the Canon 17-35mm 2.8 to the Canon 16-35mm F/2.8 II
 . All were good, but lacking on the borders and corners. All that changed in 2014 when Canon launched their 16-35mm F4 IS. It's as optically perfect as you're going to get from 16 to 35mm. After exhaustive and thorough testing both on charts and in the real world, I can tell you that Canon engineers optimized this lens for 16mm at F4. On the long end, it's great wide open, but superb stopped down. And I don't use any of these terms loosely. This is a stellar performing lens. And it works superb on crop-sensor cameras too--which truly shows off Canon's engineering because rarely do full frame lenses perform stellar on crop sensors due to magnification of a small portion of glass.
Size and Weight
The Canon 16-35mm being a full frame lens is quite large, but at least it's light. It feels light and airy, but solid and rugged at the same time. You feel confident using it. It doesn't feel quite as solid as older all-metal versions, but it's not necessary due to modern engineering plastics. If you have a DSLR, you already in large-size territory so don't sweat the size of this lens. Just grab it and go. Well-captured memories never regret the extra size and weight needed to preserve them. If you want, the Canon 16-35mm F/2.8 III features identical optical performance as this F4 version, but costs more and weighs more. Use this F4 version to shoot things that hold still or use the 2.8 version to shoot things that move (in low light).
features identical optical performance as this F4 version, but costs more and weighs more. Use this F4 version to shoot things that hold still or use the 2.8 version to shoot things that move (in low light).
Weathersealing
Canon boasts their latest generation of weather sealing on this lens--sealing is completed when you fit a 77mm filter to the end of it. I recommend a B&W 77mm UV filter for protection and near 100% light transmission. I've shot in pouring rain all over the world with varying humdity and never had any problems.
for protection and near 100% light transmission. I've shot in pouring rain all over the world with varying humdity and never had any problems.
Optical Quality
By far, the best. Not only the best from Canon, the best period. This lens rocks where you need it most and that's wide open at F/4 @ 16mm and at all ranges.


Unique Perks
Most lenses, including Canon's own and even newer generation lenses don't perform optimally wide open. This lens does. Razor sharp out to the extreme corners wide open at 16mm. Why is this a unique perk? Well in addition to being inherently sharp wide open, when you combine that with the built in image stabilization, you can get museum-grade shots without using a tripod. I shot in some quiet churches in Europe and at The Shard skyscraper in London--two areas where tripods were prohibited, and I came out with some shots that would be impossible without this lens. Hand-held for nearly a second wide open, you can shoot at ridiculously low ISOs where every other tourist is shooting at 56k ISO because they don't have a tripod or a lens with IS.
 No tripods allowed? No problem. Hand-held from the top of The Shard. Magic of IS and earth shattering wide open performance.


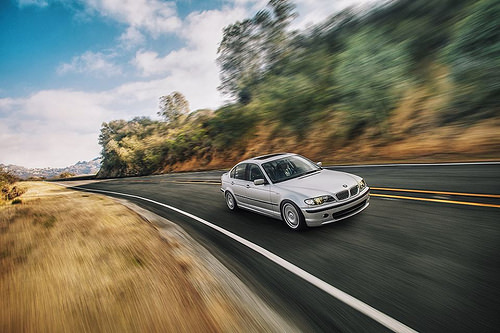
Shot at 24mm F4

Great for environmental people shots, too!
Unique Perks
Most lenses, including Canon's own and even newer generation lenses don't perform optimally wide open. This lens does. Razor sharp out to the extreme corners wide open at 16mm. Why is this a unique perk? Well in addition to being inherently sharp wide open, when you combine that with the built in image stabilization, you can get museum-grade shots without using a tripod. I shot in some quiet churches in Europe and at The Shard skyscraper in London--two areas where tripods were prohibited, and I came out with some shots that would be impossible without this lens. Hand-held for nearly a second wide open, you can shoot at ridiculously low ISOs where every other tourist is shooting at 56k ISO because they don't have a tripod or a lens with IS.


Shot 16mm on crop Canon EOS M3 . (24mm equivalent)
. (24mm equivalent)
I hope you enjoyed my review of this Canon 16-35mm F4 IS . I appreciate you guys using my links per above--it helps me earn a tiny percentage when you guys make purchases. Appreciate it!
. I appreciate you guys using my links per above--it helps me earn a tiny percentage when you guys make purchases. Appreciate it!
For inquiries: e46mango@gmail.com


