Friday, June 9, 2023

Rinseless Wash - And some of my favorite detailing products

  Rinseless Wash


The three newest & strongest rinseless washes in the industry.


I've recently discovered Rinseless Wash.  I've heard of Rinseless and Waterless Wash before, but always sort of thought they were gimmicks and never gave it proper thought.  I am super picky about my car's finish.  And my car is black so I'm ultra sensitive to underperforming products.  So a few months ago I gave it a proper try and it's now my preferred way to wash. I wash weekly, sometimes twice a week since it's so easy and fast. I wish I had discovered this method sooner!

Traditional soap and water washes have their place for sure.  For example if your car is super dirty & soiled, a pressure wash with buckets of soapy water is the way to go.

For the enthusiast that cleans their car often, and you have only light  to medium dirt build up, Rinseless Wash is the way to go... if you do it safely and use common sense practices! I highly advise AGAINST using any Touchless wash for your Tesla which seems to be the ultra trendy thing to do. Those extremely harsh chemicals will burn seals and trim causing oxidation. We see it time and time again on the forums as well as cracked charge port doors from the pressure.  Wash your car the safe, effective, and fun way.

Why use Rinseless Wash?

1) It saves money. You use 256:1 dilution ratio of any of the three above. This means 1 ounce for every gallon -- which is about one cap full (about 1/2 oz) of Absolute or DIYDetail per gallon or 1 cap full (which is 1 oz) of ONR per TWO GALLONS (ONR uses a big cap). Me personally? I tend to fill my bucket with three gallons of water and I get TWO complete car washes out of it. I could probably get a third wash out of it but I'm a bit on the picky side!

2) It's safer than traditional washing.  The three products above use polymer technologies.  Essentially the polymers encapsulate the dirt (think of a science bear hug) and break it down into smaller pieces and lift the dirt off the paint.  With the right wash medium to collect it (more on this later) the dirt will come off the car safely and be deposited in the bucket when you rinse.

3) It's fast & clean.  Doing one panel at a time, you can work efficiently and have minimal mess. You can wash your car in the privacy of your garage and don't have to pull out the hose or drive to the car wash.

How to use Rinseless Wash?

Step 1) Fill a bucket with 2 to 3 gallons of water (I'll provide links to everything I use below). Make sure you have a grit guard to catch the dirt and keep it from being redistributed back to your wash medium (sponge, microfiber, etc) Insert the correct amount of Rinseless Wash into your bucket.  1 oz per gallon or 256:1 ratio.

Step 2) Pre-treat your car by misting/spraying the surface using the Rinseless Solution you just created (dip your sprayer into the bucket and fill it up with the pre-mixed solution) I'll link to my favorite pump sprayer below. There's all kinds.  Pre-treating allows the product to soften and soak up and encapsulate the dirt to "work" the dirt by the time you get to it. This step is crucial! None of the manufacturers above say this is necessary but as an enthusiast, this is the way to go.  Pay special attention to extra soiled areas and give them a bit more spray love than the other parts.  Examples: Fender/door behind the wheel, rocker panels, back hatch/trunk area. I usually spray extra solution in these areas. Be liberal! It's cheap!

Step 3) Dip your wash medium into the bucket. Wring out extra solution into the bucket and use the wash medium when it's barely dripping -- do not use the wash medium soaking/dripping wet.  You want it on the verge of dripping.  This scientifically allows the rinseless polymers to do their work and let the wash medium pick up the dirt rather than leaving it on the paint.  WASH ONE OR TWO PANELS at a time for best/easiest results. Wipe your wash medium in straight lines or motions.  I tend to use an "S" pattern starting at the top working my way to the bottom of one panel. Then dip, rinse, wring out, and repeat on the next panel. The cooler it is outside (or inside) the more panels you can wash at a time.  BE GENTLE. Do not "scrub" the paint. Let gravity do the work. You are doing a contact wash, not pressure wash. Just wipe. do NOT scrub. Yes polymers are doing their work but use common sense.

Step 4) Dry.  No need to rinse.  Dry using the same motions above. Straight light S pattern from top to bottom, panel per panel.  Avoid pressure points. Avoid hard pressure. Bonus: Use a drying aid for extra shine and resistance to water spots. Links below.

In summary: Pre-Treat by spraying/wetting panel with pre-mixed solution, Dip your sponge into your bucket, wring out to verge of dripping, and gently wipe each dirty panel one or two at a time (door, fender, quarter panel, hood), then simply dry!  Dip and rinse sponge between each panel cleaning!


Wipe in straight horizontal lines. Notice the polymers action that trails the sponge -- polymers are essentially long chains that bind water to eachother. This helps pull the dirt off the surface.

This is how you pre-spray the surface.  Let soak about a minute before you start with your sponge.  Walking around your vehicle and pre-treating it in advance will give you time so by the time you finish, you can start cleaning using the sponge.


My Recommended Products

Yes these are affiliate links which I receive a small commission for every dollar spent. It does not affect you. But I do genuinely use these products for my personal rinseless wash. I appreciate your support.

1) CG Bucket. - Yes it's a bucket but it comes with a fancy sealed lid and doubles as a stool you can sit on. Plus the next item is absolutely critical and is made specifically for this CG bucket

2) Cyclone grit guard - This traps & funnels dirt to the bottom of the bucket where the dirt cannot travel back up into your sponge and back onto your paint scratching it. This takes the standard usual grit guard you may have seen and takes it to the next level. Protect your paint from scratches.

3) Pump Sprayer - This is a cheap basic pump sprayer with an adjustable brass nozzle. It works well. Though I will probably upgrade to an IK pump sprayer next -- a purpose built german pump sprayer well known in detailing circles!

4) Ultra Black Sponge - Ultra vital. This sponge is hands down the best wash medium in the business. It will last years and is carefully engineered for use with Rinseless Wash. It uses laser etched cuts to trap dirt.  Dip it in your bucket after wiping each panel and scrub it against the grit guard to dislodge any sand/dirt you may have lifted off your paint.  Remember to be gentle and use straight lines. You are basically sweeping dirt away in straight motions.  Rinse after every panel.  You can wring it out and let air dry after each use or you can leave it in your bucket for the next wash. I tend to get two washes out of every 3 gallon bucket full of rinseless. Save it for your next wash!! This sponge is thick and avoids pressure points. Pressure points scratch.

5) The Rag Company Guantlet Premium Drying Towel.  I can't say enough good things about this towel. Worth every penny. Quite simply the best towel in the business hands down. Fold this towel in fours (or as thick as possible) and wipe dry in straight lines.  This towel is thick and avoids pressure points from your hands. Pressure points scratch. Notice a theme here regarding pressure points?

6) P&S Absolute Rinseless 

7) Adam's Graphene Detail Spray - I mist this on every panel (1 or 2 sprays) immediately before drying with the gauntlet towel. This does two things: it aids drying and adds a bit of protection until my next wash.

8) Chemical Guys V7 Optical - I feel like this is an under dog. This is an older product but I swear by it. No detail spray has given me the results this does as a last step. This is my final show car magic step.  It goes on super smooth and gives incredible gloss and slickness, smells great, and dries free of any residue. Truly a magical product I stand by.    I wipe it on with these magical microfibers from the Rag Company.

Really -- you don't need every item on this list. You can get by honestly with just any of the Rinseless Wash, any old bucket, and microfibers. But for best results I recommend at least using the UBS sponge and a grit guard and the Gauntlet drying towel. You can also use any spray bottle to mist/pre-treat the panels. The other stuff is icing on the cake. Who doesn't like icing?

Now how do I rank these Rinseless Washes?
For me the top place goes to P&S Absolute.  Pros? Excellent slickness, the thickest of the three, the best scent, the easiest to use and wipe dry. Just perfection. 100/100.

Optimum No Rinse (ONR).  Like absolute, it's a polymer wash.  It smells like chemical blueberries. It works great. Though it's not as polished as P&S Absolute.

DIY Detail. It's the newest wash out there and has both polymers and surfactants. This means it pulls more dirt off the car and off the sponge when you go to rinse. I've only used it once. It seems to work great and pulls a bit more dirt than Absolute. But it also seems thin.  It definitely is the thinnest of the three -- I took a video comparing the viscous qualities of all three by shaking the bottle. P&S Absolute is easily the thickest which instills confidence when applying to my sensitive black paint.  The jury is still out for me on DIY Detail Rinseless Wash and I hope to test it out more soon. 


Tuesday, January 10, 2023

 Parrati Premium OEM Quality All-Season Wiper Blades

2019+ Lexus ES300h & ES350 (May also fit 2018+ Toyota Avalon) - Link to buy here - Amazon.com

Fraction of the cost of name brand. Highly rated on Amazon.


First. Go into your car. Start it. Then shut it off. Then press UP on the wiper stalk and hold it until the wipers raise into the service position. Exit the vehicle.

Simple before and after shot. Old blade on left and new Parrati Premium on the right. So far they wipe excellent and the fit is just like stock (OEM). It clips into place very securely.


Install was a breeze. After raising both arms to service position, then lift both arms off the windshield so they are pointing upwards. 

(BE CAREFUL NOT TO DROP THE WIPER ARM ONTO THE GLASS WITH THE OLD BLADES REMOVED--YOU CAN CRACK THE WINDSHIELD. Use common sense!!)

Just need a flat blade screw driver to lift the plastic tab on the stock wiper then the stock wiper blade slides out. You may have to wiggle the blade a little bit to free it. Then you take your fingers and undo the little plastic cover of the new Parrati blades and you poke the stock wiper arm through the little plastic door you just lifted and then hook the new blade to the arm until it snaps, then you close the plastic cover for a second snap. Of course remove the green plastic protectors before use! Done!


Link to buy - Amazon.com

Thanks for using my Amazon affiliate link. I earn a small commission for every dollar spent using my link. It does not affect your price whatsoever!


Wednesday, September 1, 2021

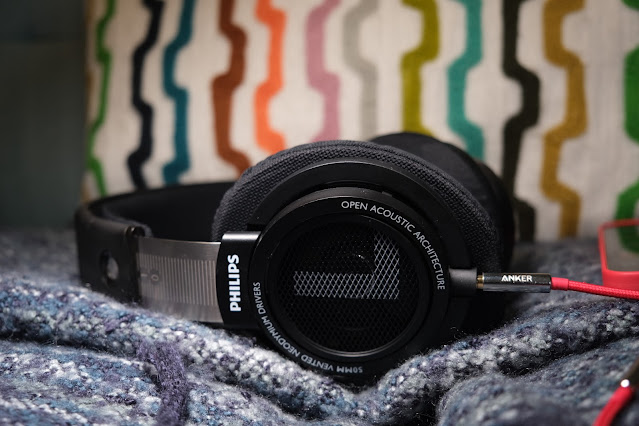
Philips SHP9500 Review - Grandest Headphones I've Ever Used - under $75!

Philips SHP9500

The Grandest Headphones I've Used | Under $75, Too!


After using the Sony WH-1000XM3 and Sony WH-1000XM4, their audio quality to me left something to desire.  They looked great, felt great, had supreme fit and finish, supreme noise cancelling, but for my purposes: listening to music, they fell short.  I tried to justify them cause they were at the top of everybody's list.  But honestly, regardless of EQ settings, they just sounded dull and flat.

Fast forward to the Grand Legend that is the Philips Audio SHP9500.  RTINGs said (and I'm paraphrasing) it's one of the best sounding headphones they've tested regardless of price--and they test some beasts.  I had my eye on these a few months ago for a few months but they were out of stock everywhere for the longest time.  Well Amazon just got a batch in and I had to try them.

Needless to say I am impressed. I've been listening to them for a week for hours on end and they truly live up to the hype. I was ready to return them immediately if they sounded like junk, but that is not the case at all.  They sound absolutely crisp and clear.  I'll spare you the nerdy details and all the big tech words audio geeks use, but suffice to say these sound absolutely fantastic and they're easily worth double or even triple the price.

As far as comfort goes, they are very comfortable. The stock pads could probably use some improvement and I plan to get some, possibly Brainwavz direct replacements. For now, the stock ones are fine.  Also these work great when plugged into the PS5 controller for gaming--they sound way better than dedicated gaming headphones. 

Specs:

Ready for use with or without amplifiers
  • Frequency range: 12 - 35,000 Hz.
  • Sensitivity: 101 dB.
  • Maximum power input: 200 mW.
  • Impedance: 32 Ohm.
  • Acoustic system: Open.
  • Magnet type: Neodymium.
  • Speaker diameter: 50 mm.

What I paired them with:


Optional:

MyPin Headphone HiFi Amplifier (Not shown--Takes these headphones from a 9 to a 9.5)  For the price, sure. But not a game changer. Definitely louder, and ever so slightly bassier.  


Thank you for visiting my blog. I take a cut of every purchase made using my links. It does not effect you.  My reviews I can assure you, however, are items I actually bought and love.

Sunday, April 11, 2021

7th Gen 2019-2021+ Lexus ES Subwoofer DIY - Add subs to your stock system easy (Standard + ML)

 7th Gen Lexus ES300h & ES350 2019+ Subwoofer Install


Adding a subwoofer to the stock 2019+ Lexus ES300h and ES350 standard 10-speaker or 17-speaker ML is easy.  This DIY/guide is based on my particular install on my 2021 ES300h with standard 10-speaker audio system.  To my understanding, based on reading the wiring diagrams, the wiring/amp pinout is the exact same as the 17-speaker premium ML system.  Do your own research to confirm first before performing any work. If you do not feel confident in working on your car, take your car to an audio shop! If you have a hybrid, take extra care around the large battery pack beneath the seat. This can cause serious harm or even death if you get shocked by it. Just be extra careful.


What I used or is needed:

Ratchet 3/8"
10mm socket (for battery terminal)
13mm socket (for seatback ground bolt for amp ground)
Wire crimpers
Wire strippers
Flashlight
Tesa Insulation tape (for a professional OEM install to wrap the wires)

Advanced/experienced installers can skip to the wiring/pinout information.  The installation of a subwoofer is pretty basic and the same across all cars except for the exact wires you'll need to tap for audio signal.

Step 1: 

Run your power and ground.  The amp kit will come with ring terminals. This is where a heavy duty solid wire crimper is needed. For power, start by opening the trunk. The 12V battery is in the trunk on the passenger side.  You lift the carpeted flap up to reveal the battery.  Using your 10mm socket, attach your power line.  Remove the fuse for now so you don't touch the power wire to ground causing a spark or a short. Install the fuse at the very very end to be safe!  You won't need much 12V power cabling because the battery is in the trunk where you'll keep your sub. So make sure you cut after so you know how much cable you need.  

Next you'll need to run your ground cable. The length should be no more than 30" according to the manual of my Rockford Fosgate subwoofer.  So I cut it to 30".  For this step, I removed the rear bottom seat cushion. Simply pull up on each side and the seat cushion pops upward and out.  (Upon reinstall, make sure the seatbelt buckles slot into the holes of the cushion.)  I used one of the metal bolts holding the seatback to the chassis to ground my amp. Use a 13mm socket. You'll need to carefully fish the wire through slots/holes at the bottom/back of the seat into the trunk. Use a flashlight. A hanger wire taped to your wires may aid you fishing the wire. There's plenty of slots/holes to feed wire through. Make sure you don't have wires touching any sharp metal. Zip tie them down if needed. Reinstall the seat last. You'll need to run some extra wires across the driver's side to the amp under the driver's seat and subwoofer control under the drivers footwell.

Step 2: 

You'll need to access the stock amp. For both the standard and ML audio systems, the amp is under the driver's seat.  You do NOT need to remove the seat to access the amp. Simply move your seat forward and as high as it will go. You'll need to remove the headrest first by tilting the seat back.  

The amp has a plastic cover held on by three plastic rivets. Use a flat-blade screwdriver to remove.

The harness you'll need is the farthest right one, towards the front of the car.  Naturally these wires are the wires that carry the amplified power so they are heavier duty for function and longevity.


These are the wires on both the standard and ML amp. Same harness, same colors according to my research.  If your amp/harness does not look like this, you may need to do some research. Also this is for my 2021 ES300h standard audio system. Your year/model may vary.


Wires #6 and #21 blue and tan are the stock subwoofer output wires.  Tap your high-level input harness to these.  Since the Rockford Fosgate high-level input harness has two pairs of power and ground for two speakers, just splice both positives and both negatives of the Rockford Fosgate harness together, then you'll have one positive and one ground to tap into the stock harness blue/tan. The polarity doesn't matter here as the amplifier will usually have a phase switcher. 

While you're here, also tap the remote wire. (DO not rely on the high-level input to power on the sub--i made this mistake and got a very loud rumble for three seconds every time i shut off the car.) You'll need to use a remote turn on lead to ACC/switched 12V.  I used a multimeter and the wiring diagram to find a switched 12V wire to tap on the left-most (first) harness on the amp. I used the white wire on the upper top corner. Use a multimeter to confirm it's 12V when ignition ON and 0V when off.  Run this wire along with your signal wire across the left side of the car (just use your fingers to stuff them in the plastic sill covers (or remove them if you want) and run them to the trunk.  


Run your signal wire as well as the remote wire and volume bass knob wire here. A total of three wire groups.  I tucked them more neatly after I took this photo. This is just to show the general area where I ran the wires.  A bright light can help you see holes to fish the wires through.  


Wires wrapped in Tesa tape (see link above) for a professional clean tidy look. Notice in the second pic, I wrapped the bass control knob wire together with the other wires.  This particular subwoofer/amp combination is nice because you can easily detach the wires when you want to remove the sub. It has a quick disconnect.  

This subwoofer also comes in 10" and 12" models. The boxes for both are bigger.

Overall this setup provides a nice kick to the stock setup, particularly with my upgraded dash speakers.  Nothing crazy, just a bit of added low end to complete the sound stage.

Using my Amazon Affiliate links, I get a small percentage of each purchase. It does not affect you. I appreciate it! Also shout out to Crutchfield who helped me made this happen.  They sell the sub at this link: https://www.crutchfield.com/S-B37Ou8pVaDi/p_575P3008P/Rockford-Fosgate-P300-8P.html


Wednesday, February 17, 2021

2019+ Lexus ES350 FitCam Integrated Dash Cam Install and Review

 Fitcam Dashcam for 2019+ ES350

1080P @ 30FPS, 170° Viewing Angle, Plug and Play, Parking Monitor

NO TOOLS REQUIRED!

Yes, there's an affiliate link involved for this DashCam and yes I make a few cents for every dollar purchased using my links, but I have to say this dashcam absolutely rocks.  It's custom-made just for the 2019+ Lexus ES350 and has a 100% OEM fit and finish. Install is 100% plug and play.  This dash cam comes with a plastic housing that replaces the stock housing behind the mirror that contains the radar sensor.  This ensures a 100% stock appearance with the exception of the new bump added for the camera which is mostly invisible from the driver's seat.  I tested it out and the image quality is great.  You can download the iOS or Android app. For me I have an iPhone 12 Pro and downloaded the app using the instructions and setup is extremely easy.  Also this dashcam comes with a Sandisk memory card-- a surprise to me!

So how do you install it? Well once you open the package, you can see it's mostly self-explanatory. But I'll do my best.

1) Optional but helpful, using your hands, gently pivot the mirror down to give yourself some working room.

2) Using your fingers, pop the upper portion of the black plastic housing off.  

3) Slide the large portion of the housing downwards following the windshield--it's held on by two clips.

4) Turn over that big black plastic piece and locate the two orange/brown clips. Gently pop them off using your fingers, you may need to pry with two fingers. BE GENTLE--DO NOT BREAK THESE.

5) Transfer the two clips to the new black housing/camera housing that the kit comes with.

6) Unplug the stock camera wiring harness located on the right side.  Plug the included wire harness into the windshield where the stock harness was unplugged, then plug the included FitCam cable into the stock receptacle, then plug the round cable into the camera's corresponding round cable.  

7) Simply slide the black plastic camera housing upwards until those two clips lock in place. Before you slide upwards, make sure the black plastic housing is flush with the windshield.  Once you hear it click into place, stuff the wires in the available space/opening and take the Fitcam black plastic small piece and clip it into place.  Be careful not to bend the plastic tabs... they may bend if you dont align it 100% at first. If this happens, simply bend them straight with your fingers and reinstall carefully.  

8) Download the app using the instructions by scanning the QR code and follow the instructions.  

9) The dashcam is recording when the light is flashing blue--which should be automatic every time you drive the car.

That's it! Enjoy! Buy the Fitcam for the 2019+ ES350 by clicking here 


Monday, February 24, 2020

New GRILZZ for the CT200h

NEW GRILLZ

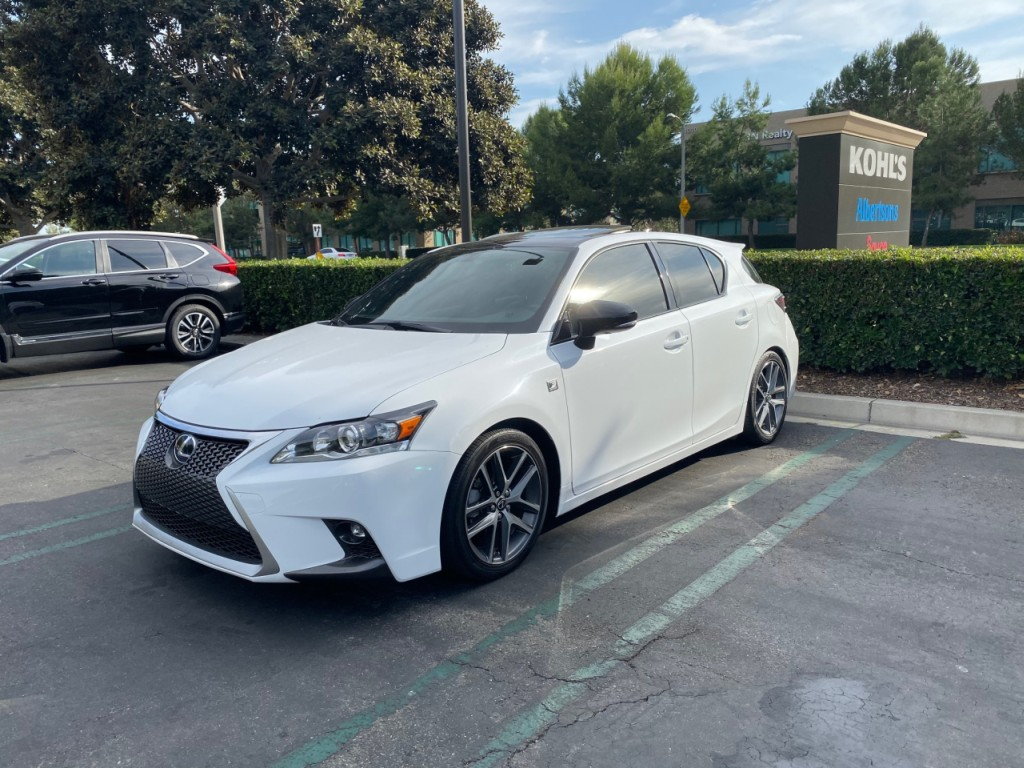
I bit the bullet and purchased the 2016 lower bumper chrome grille surround trim for my Lexus... cough Prius. Brand new from Lexus, it was $280 shipped through eBay via Bell Lexus North Scottsdale. These guys rock and are always lightning fast. Part #53122-76020.  It's a great upgrade for 2014-2015 owners that unfortunately get the gray painted plastic trim piece. 

You can also get the OEM black chrome 2-piece kit (upper and lower) through a Japanese Lexus Dealer... but it's big bucks. I thought about it but honestly this will do for now. Plus I like the bright chrome. Adds some presence.

Installing the piece was not fun... whole bumper had to be removed... easy.. but the hard part was how the piece attaches to the bumper from the back like a puzzle. It's held in by 4 screws and a million clips and the trim piece is also integrated into the front mesh grill like a puzzle. Removing the old one is hard. The new one just snaps in my pressing it in.


Wednesday, October 30, 2019

Lexus CT200h F Sport blue F Sport Springs Install (DIY/Part #s)

BLUE F SPORT SPRINGS

I wanted to create a guide to assist in the installation of the blue F Sport springs. They provide a 1" drop. Part #PTR07-77110. The ride is slightly firmer than stock, but still very comfortable for a daily driver. Below, installed on my 2015 F Sport. This is for the dealer *OPTIONAL* Lexus brand BLUE F Sport springs. They are an upgrade over the factory installed BLACK F Sport springs.


I purchased mine from eBay from user Bell Lexus North Scottsdale. These guys are always fast and great and go the extra mile to help you. Response time is lightning fast and thorough should you need anything. Not sponsored in any way by them nor was I asked to endorse them. They just did a great job and I thought they deserved a shout out. If you google the part #, they're actually a bit cheaper elsewhere from other dealers on the web. There's a sale going on right now.

There's tidbits of information out there, but nothing collective all in one place. So that's what I set out to do with the creation of this thread.

This is a guide only and if you are incapable or not confident, you should consult a professional to perform the work. But as many of us are enthusiasts, some may feel up to the task. If you have proper equipment and tools, exercise good safety measures, and work with a friend to help you, this job is not too difficult.

I did this in my garage with the following tools. They are not ALL necessary, but it helps to have all of these. I've provided links to some of the specialty tools that I actually own and have used in this project. The others are basic tools and you can find them at your local home depot or wherever you get your tools. Harbor Freight is decent for home projects too.

Safety glasses
Low profile jack (got mine from Harbor Freight)
Quality steel jackstands
Ramps
Breaker bar (1/2")
Torque wrench (1/2") capable up to at least 177 ft. lbs
Ratchet 3/8"
Ratchet 1/4"
Ratcheting wrench 14mm
Sockets metric 10-22mm (off top of my head, you'll need 13, 14, 17, 18, 19, 22) but you could need the other sizes, I forget. Just have a decent set. The bigger ones, I recommend 1/2" drive, but you can use a step down adapter if needed)

Front Struts

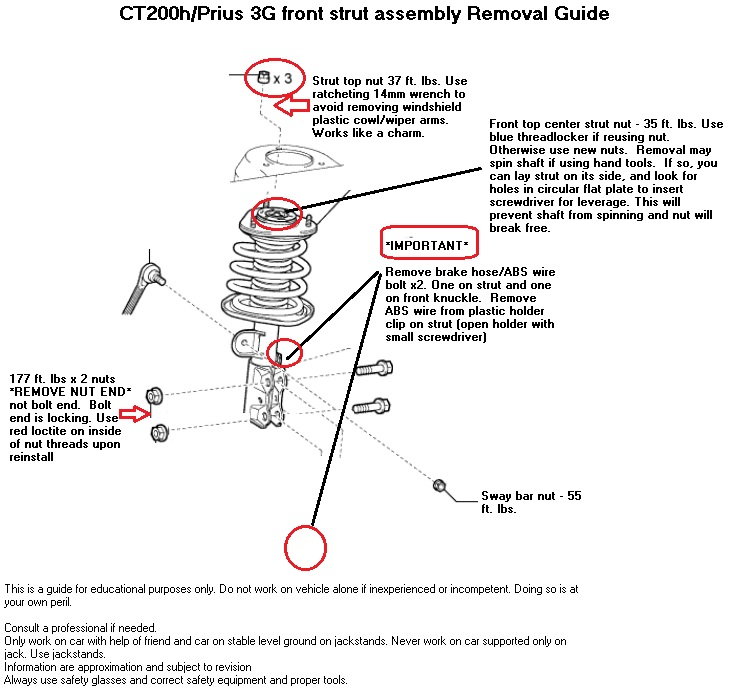
I created this hand drawn diagram to aid in front strut installation and removal, as well as the rear shock removal and install. All the important parts required for removal of the strut assembly are outlined in red with important notes. So I'll just give some general advice.

You cannot work with one corner of the car lifted up only cause the sway bar. If working on the front, the WHOLE front needs to be lifted off the ground. Same goes for the rear. So get your jackstands ready.

You do NOT need to remove the front plastic cowl and windshield wipers for removal of the strut. At least not in the CT. The Prius you may. On the CT, the strut nuts (3 per tower) are removed using a ratcheting 14mm wrench like this one. This alone will save you a good chunk of time. Other guides have you remove the cowl.

I found my swaybar nut to easily remove and I did not need to hold the shaft in place w/ a socket. It also easily tightened. Your experience may be different, so have a hex head socket and ratchet ready in case it spins in place.

Removing the center strut nut... you should use an impact to easily remove this. I did not have one so I used hand tools - 19mm socket and breaker bar. I found of course my shock shaft to spin. Close inspection of the circular flat plate at the top spring coil reveals holes. Pull the rubber back and you'll notice them. You can stick a screwdriver inside and use it for leverage. Nut removed easily at that point. Obviously before you remove this, make sure your spring is compressed so there's no pressure when the nut is removed. Failing to do so can result in serious injury. When removing the strut mount/top nut, always make sure you point the strut *AWAY* from you at the wall or something similar. I always find it good practice to cover the area with a heavy blanket, box, or other object as to protect yourself. If you compress the spring enough it shouldn't be a problem.

Personally, using these exact high quality spring compress sticks, I found I did NOT need to compress the spring a whole lot to relieve tension. My experience was that when the top coil spring was at least partially lifted away from the rubber (you'll see dark/clean rubber) then at least enough tension was off. The top nut came off easily and the top mount did not pop off with any pressure. Always coat the spring compressor threads in motor oil as well as the top washers. you want any metal metal area under load to be coated in oil so it turns easy and does not create too much friction and heat.


Rear shocks

The rear shocks are pretty easy. Follow my notes on the diagram below.

Important notes:

It's important the inner control arm fastener is loosened, and not removed. The arm needs to pivot. You can severely wear or tear the bushing if you leave this fastener tight as you pivot the arm down to remove the spring. You must also re-tighten the bolt as the VERY VERY last step. The car must be up on ramps on its own wheels at its natural resting position. Otherwise you can and will wear or tear the bushing if you lock the bushing then put load on it. I drove the car back and forth a few feet a few times and bounced the car so it can be as close to naturally resting as possible ONCE up on ramps. Let the car settle.

The rear sway bar only needs to be detached from the control arm at the very bottom of the control arm. Do not touch anything else on that sway bar including the nut above it. The nut sandwiches the rubber bushing above it. Make sure you reinstall that the same way it came out. Easy.

Be careful not to load up the shock (stretch). So remove the shock bolt first. You will need to place a jack under the control arm and lift it (slightly) to take load off the shock so the bolt slides out easy. Same for the control arm.

When reinstalling the bolts, again you'll need to use a jack to get the bolts to line up. You can use a screwdriver to stick inside the hole and maneuver/wrangle the suspension so the hole accepts the bolts. I found it to be easy on this car. Other cars like the Lexus 3IS... not so much..

It is advised to get an alignment after you do install springs or front dampers.

Everything you need to remove for rear spring replacement is circled in red below.

Consult a repair manual for accuracy before proceeding on your own car. This is just a guide for information purposes and to assist and educate others. Information contained herein is not guaranteed in any way nor is it promised to be accurate and is subject to correction or revision.

So you wanna install subwoofers in your Lexus IS CT RC GS huh? Easy DIY

SUBWOOFERS BRO.

Ok, well one subwoofer. Add a little boom boom to your vroom vroom.

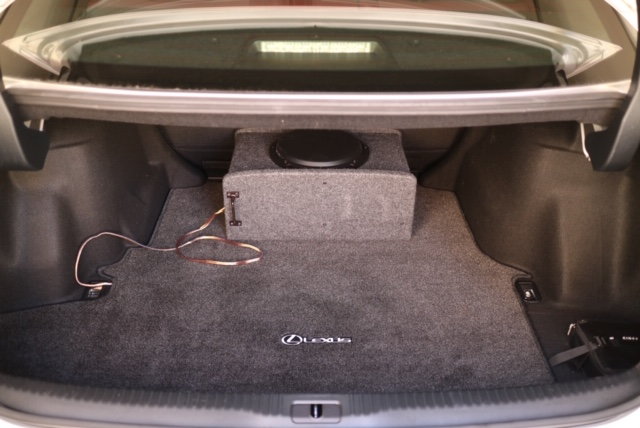
Someone requested some info on this. Installed a JL 12" subwoofer and Rockford Fosgate Amp to my 2016 IS200t non-ML system.

It sounds GREAT and I haven't even tuned it yet. The system before was meh and really this new system sounds absolutely great. I'm not really wanting to upgrade anything else now. For some reason just adding a subwoofer has enriched the sound quality. I thought the trunk being sealed would not let any bass in but boy was I wrong. HUGE noticeable difference.

Here's how I did it:

I literally bought everything from Amazon.

Amp I used: https://www.amazon.com/Rockford-Fosgate-R500X1D-1-Channel-Amplifier/dp/B00BF6HYDE/
Subwoofer I used: http://amzn.to/2cyXoZL -- Looks like it was replaced with a newer model: https://www.amazon.com/JL-Audio-CS110TG-TW3/dp/B00IF9IJ4W
12V wiring kit I used: https://www.amazon.com/BOSS-Audio-Amplifier-Installation-Wiring/dp/B000FKP7TY/ref=sr_1_1?keywords=BOSS+Audio+Systems+KIT2+8+Gauge+Amplifier+Installation+Wiring+Kit+-+A+Car+Amplifier+Wiring+Kit+Helps+You+Make+Connections+and+Brings+Power+to+Your+Radio%2C+Subwoofers+and+Speakers&qid=1572460560&sr=8-1
T-Taps: http://amzn.to/2bOCu6t

You'll also need:

Some quality needle nose pliers for squeezing the crimps. Everyone should have these.
Wire strippers/cutters (or you can use a nail clipper)
1/4" drive ratchet with deep socket 10mm
Electrical tape (optional)
Zip ties (optional, recommended)
Allen key or allen key screwdriver for the fuse holder. I think the correct size tool MAY come with the amp. Not sure I forget.
Flashlight

Time: 2-3 hours.

1) Disconnect negative terminal on battery. You'll be messing around with a (probably) very expensive amp. So don't risk it.

2) Pop trunk. Pull out trunk mat, spare tire lid, right side tool kit foam, and right-rear latch which is secured by a 10mm nut. Lift the panel on the right side up and out. Below it is the factory amp.

3) Remove factory amp and set aside. It is held down by two 10mm nuts. One facing the sky and one under the interior trim facing the front of the car. You'll need a deep socket 10mm. Tilt the amp towards you and look at the large front harness. It has a special black clip you have to unlock and pry upwards then the harness slides out. Use a flashlight and be careful not to break anything. The smaller harness just pulls right out with a push tab like normal. You'll be working with both harnesses. The large harness for the rear speaker signals (4 wires total - green/brown for positives and pink/white for their respective negatives. The negatives are directly below their respective positives. Can't miss them.

4) Take your line level input harness from your amp (assuming you bought the one in my link) and use the T-Taps to tap into the rear speaker signal wires on the large harness. These are unfiltered pre-amp signals for the rear speakers. Exactly what you want. Tip: Tap the wires when you have the black plastic part on the large harness fully locked in the up position. This ensures you have enough room to re-insert the harness into the amp because that black piece has to be fully up to go back in. Thanks to RamAir, here are the wires you need to tap on the amp: L+ Beige; L- Pink; R+ Green; R- White.

5) Now it's time to run your power and ground and remote wire. (you can do this step before #4 if you wish) doesn't matter. You'll need to run your 8 gauge power wire from the positive terminal on the battery. The wire in the kit I linked comes with everything you need, including fuse and terminals. Go inside your car and pull down the passenger footwell panel with your fingers. There's no screws. Pull it down. Don't be scared. Now look under with a flash light. There's a large rubber grommet that is on the firewall. You can see a little hole for something to go in. That's where you'll put your wire. Use a tool, wire, whatever to poke a hole in that unused rubber hole. Push your 8 gauge power wire through and pull up enough slack on the other side that you can attach to the battery. Just let it sit there. DO NOT CONNECT TO BATTERY UNTIL THE VERY LAST STEP. You don't want to short anything out. Now run the power wire down the passenger side of the car. I recommend pulling up the passenger front and rear side sill plastic scuff panels. Pull outwards towards drivers side gently using your fingers then upwards. These panels come out very easy. You should not have to fight them. Then tuck the 8 gauge power wire neatly inside and you can simply tuck in under B-pillar panel using fingers. Pull taught from the rear to make sure the wire is securely under the B-pillar panel. Then pull up back cushion of seat to get more access. Then fold down passenger side seat back. Now you can route your wire to the trunk. Avoid any sharp metal. Route the wire carefully and secure with zip ties where necessary. Run wire to roughly where your subwoofer will be and cut to size. Now put your interior back together using your fingers. Easy.

6) For ground wire, I simply used the front right metal latch in the trunk. I had to remove the little lid that comes down. Sliced it off with a razor blade. Oh well. That latch grounds securely into the chassis--I confirmed. As for your remote turn-on wire, on my 2016, it was the small brown wire in the corner of the SMALL harness. Confirm with multimeter. You want 12V when car is ON and nothing when off. Connect your amp to speaker cables, your power, ground, remote and button trunk back together. Now the last part, connect the fuse and ring terminal to positive side and reconnect your ground wire. Mine worked on the first try! Double-triple check everything you do ESPECIALLY the connections. Always work safely and if you do not feel comfortable or experienced enough, consult a professional shop to assist you!

Edit: I relocated the amp to the left side and used a ground right below the driver's tail light on the inside of the trunk. There's a 10mm bolt you remove. Perfect!

Enjoy your sweet sounding non-ML system now!! =)

These are the two harnesses you'll use that plug into the factory amp. Large harness for speaker taps (info above) and small harness for the remote turn on wire. For 2014/2015 cars, it may be blue or white I've read. Confirm with multimeter. On my 2016, it was the light brown wire in the corner.


Added pics:


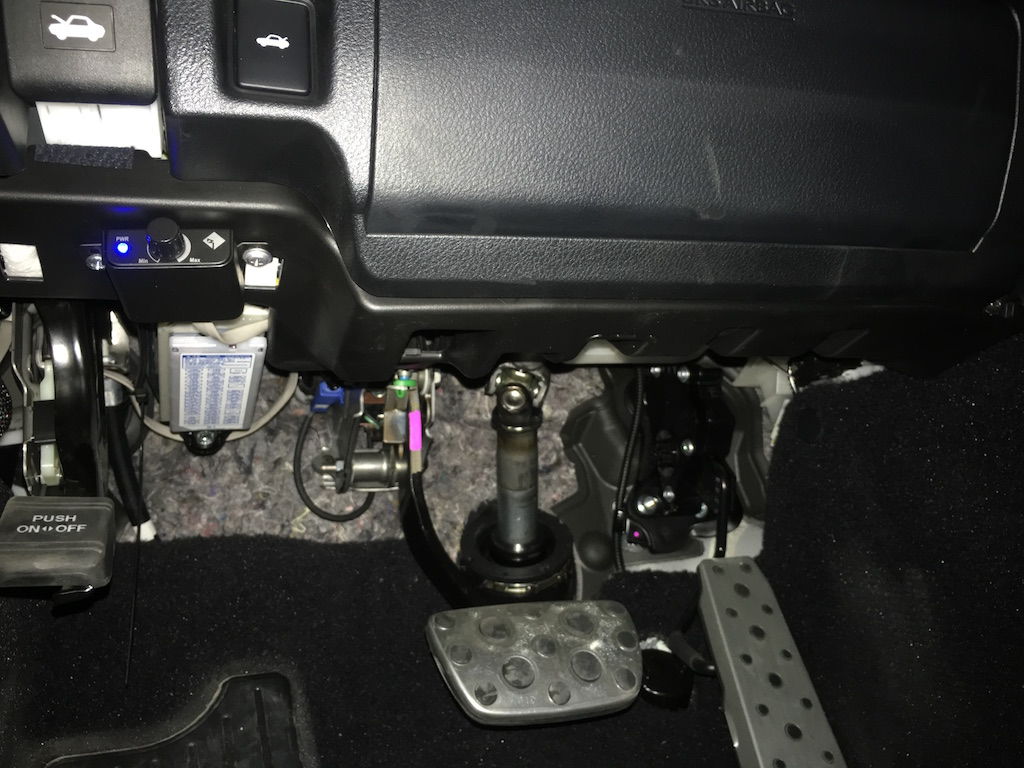
This is the base control knob mounted on the left side of the car. This literally took me 10 min from start to finish. Extremely easy route the wire. Just tuck with your fingers. Just zapped the screws right in the plastic panel. Nothing above it. Make sure you use tiny screws. The kit comes w/ them. Nevermind the zip tie hanging down. I trimmed everything up nicely after I took the pic. Used two zip ties to secure the bass control wire to some factory wiring harnesses up there. Make sure you go behind the brake pedal so you don't interfere with its operation.

I'll post pics of the relocated amp to the left side along w/ updates on install. Wires ran a bit differently, etc. Cleaner--no exposed wires. Remove box in one easy step. Still the same concept overall though.

Curbed your wheels? Fix your Lexus wheel curb rash for $15 - DIY! Super easy

WHEEL RASH DIY EASY FIX DIY @ HOME!!!

This DIY has the potential to save you thousands at least return time. It did for me. I curbed all four of my wheels on my Lexus and when I returned it at lease end, the charge was $0. All for $15 and a few minutes per wheel.

I curbed my IS200t's F-Sport wheels.

The rash was relatively minor so decided to fix myself. The parts are less than $15

Here's what I purchased:

Sandpaper kit: http://amzn.to/2cvIXWK
Perfect match F-Sport wheel paint with applicator and clear coat: http://amzn.to/2cQmJ1l
Glazing putty: http://amzn.to/2cG5Q4j


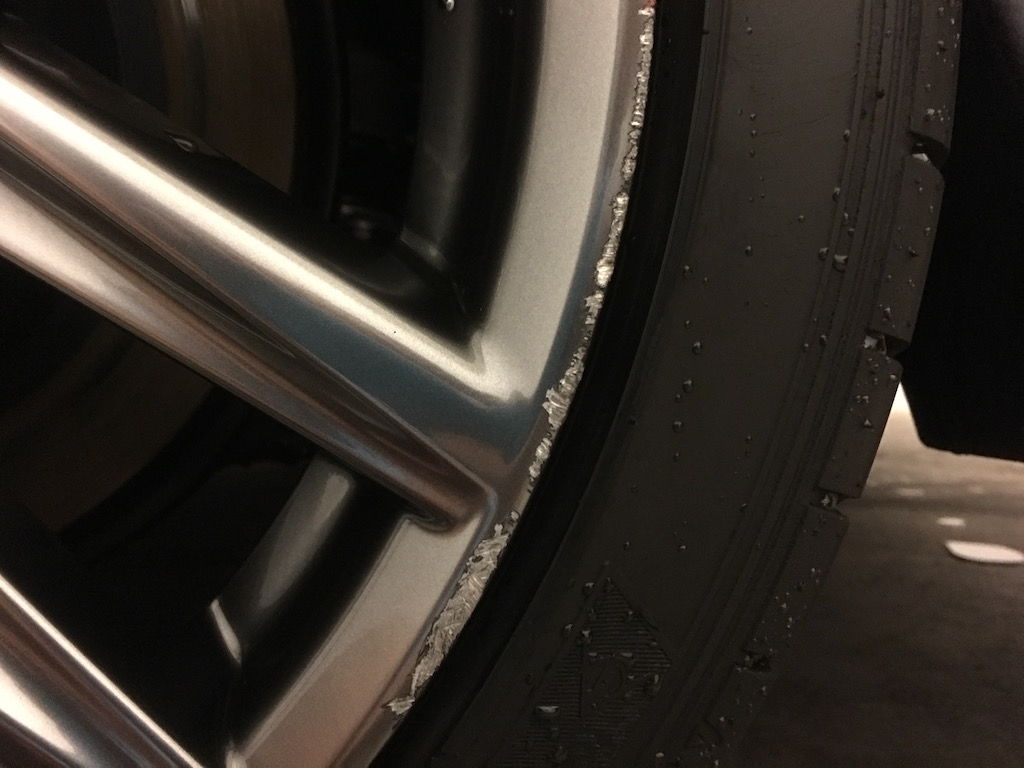
Here is what I did to the wheel :(


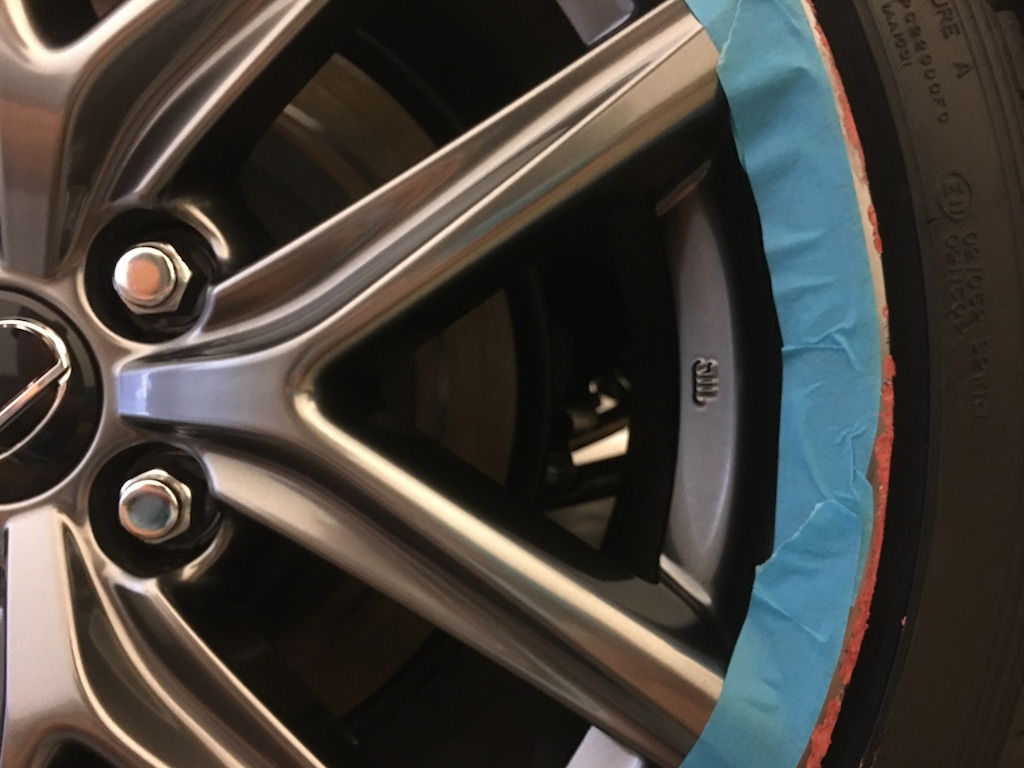
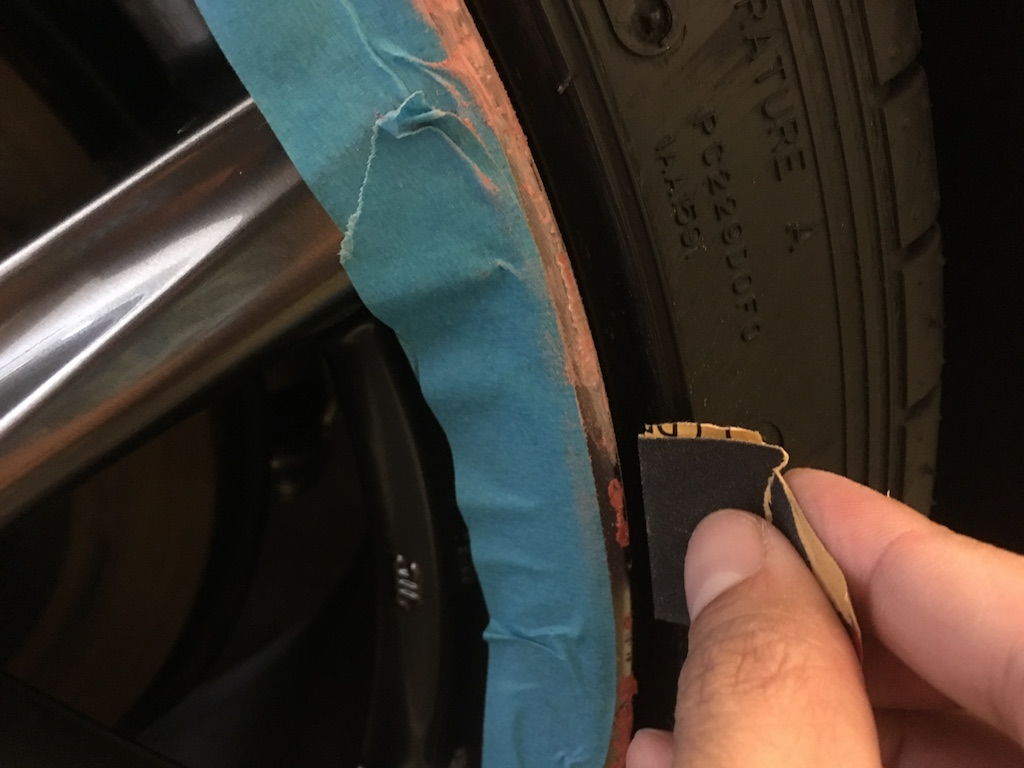
Start by using painters tape and expose only the area you are working with so you don't accidentally scratch or sand the good paint. Then using a q-tip or similar tool, apply the glazing putty over the affected area. try to be as smooth and even with the wheel as possible so you don't have to sand excessively. Let sit 15-30 minutes


Then take your sandpaper (i used 200 grit) and fold it into a small square. And slowly sand down smooth the hardened putty. Don't be afraid of scratching/scuffing the surrounding paint between the curb rash. do the whole area. After you are done, you can apply more putty and repeat the process. I decided I didn't need the wheel to look absolutely perfect. Just good enough. Then shake up your phantom gray pearl paint and apply it over the putty smoothly. Let dry then apply clear!


This is the paint I used.


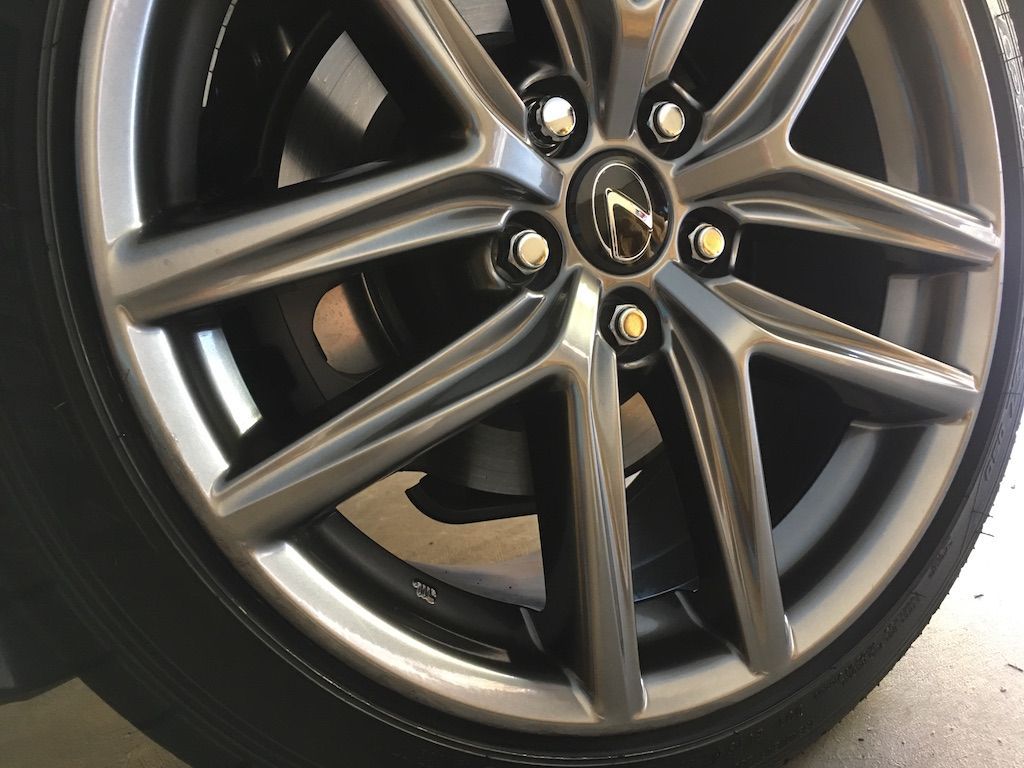
And the finished product. I could've spent more time on it and sanded it down more and smoothed the paint out before applying clear. But I don't have time for it and it's good enough for me. It looks WAY better than before. And from normal viewing distance you can't tell. You have to go up close. I actually had to look very closely and squint to find the damage so i could take a picture. The touch up paint is a perfect match. Keep a spare in your glove box to touch up nicks and curb rash. You don't even need to putty the curb rash if you want, just paint over it so it's not noticeable!

Enjoy!

Lexus 3IS Brake Pad DIY (2014-2020) Lexus IS RC front brake pad DIY

BRAKE PADS

Background

I realize there's other DIYs out there, but here's my personal experience and own take on this job. This job isn't involved as some of the other DIYs make it out to be. I found I didn't need as many tools or steps as others have listed. But I still thank them for the inspiration. I have a solid background in BMW and this job was much easier than those cars (even though they're not that hard as well) My 2016 IS200t has 11,100 miles on them and the pads are at 4mm. I drive my car moderately, not too easy and not too hard. 50/50 city and highway. These high friction pads wear out blazingly fast. I did not turn the rotors, I left them as is. I figure if others can get 60k out of their F-Sports with low-friction pads, then the rotors should last a bit longer. I don't think the rotors know any different what pads they have. Even though, if I suspect any excessive rotor wear or abnormal noises, I'll replace the rotors. I just thought 11,000 miles was unnecessary. Very minimal lip on them. They still look decent.

Tools you'll need (Including links where to get them)

Professional Genuine Lexus Pads (High-Friction) Or you can Get Alternative LOW DUST Professional Genuine Lexus Pads (LOW FRICTION "BLUE BACKS" As E46CT calls them) These will create lower dust, but not as good braking. Up to you! I went with high performance F-Sport style!
Some people also like https://www.amazon.com/Akebono-ACT1118-ProACT-Ultra-Premium-Ceramic/dp/B001DCH2FK/ref=as_li_ss_tl?s=automotive&ie=UTF8&qid=1500237425&sr=1-1&keywords=IS350+akebono&linkCode=sl1

Low-profile aluminum racing jack (you can use whatever jack you want, this is what worked for me)
Toyota/Lexus jack pad/puck (this prevents you from bending the pinch-weld jack points on the unibody)
Jeweler's small screwdriver
C-Clamp
Screwdriver (pictured) optional -- I ended up not using it. This job is too easy!
Torque wrench 1/2" drive

After Install Tips:
Remember to use this as educational reference only. If you choose to perform your own work, remember to work with a friend, wear safety glasses, work on a level solid surface, apply the parking brake and never go under a car supported only by a jack alone. Use quality sturdy jackstands if you need. In this case, I did not personally choose to use jackstands as I never at any point placed myself under the car.

After you install your new brakes, remember to firmly press the brake pedal a few times before taking off. Failing to do so may result in loss of brakes. Just a few pumps after start up does the trick to firmly seat the calipers, pads, and rotors.

I took the car on a test drive in an open area without cars and firmly stopped the car from 55 mph to 5mph 3-4 times in a row. This seats the new pads on the rotors. This may or may not be necessary but I did it anyway. The car performs as good as new. No noises whatsoever.

I chose to not use any lube or cleaning supplies. It's recommended to, but personally I did not use any. I feel the brakes will be dirty no matter what and the car stopped and sounded just fine at 11,100 miles and will be the same with 11,101 miles with new pads. And sure enough there's no difference. Car brakes flawlessly. No noise.

Though this job was EXTREMELY easy, I must say If you feel unsafe or unsure about working on your car, consult a professional mechanic or your local Lexus dealer. Be safe!

Fun Fact
Lexus uses Textar for their F-Sport high friction pad supplier. This is the company BMW has been using for decades for their brakes. No matter why this Lexus stops so good--it's using German BMW brakes!


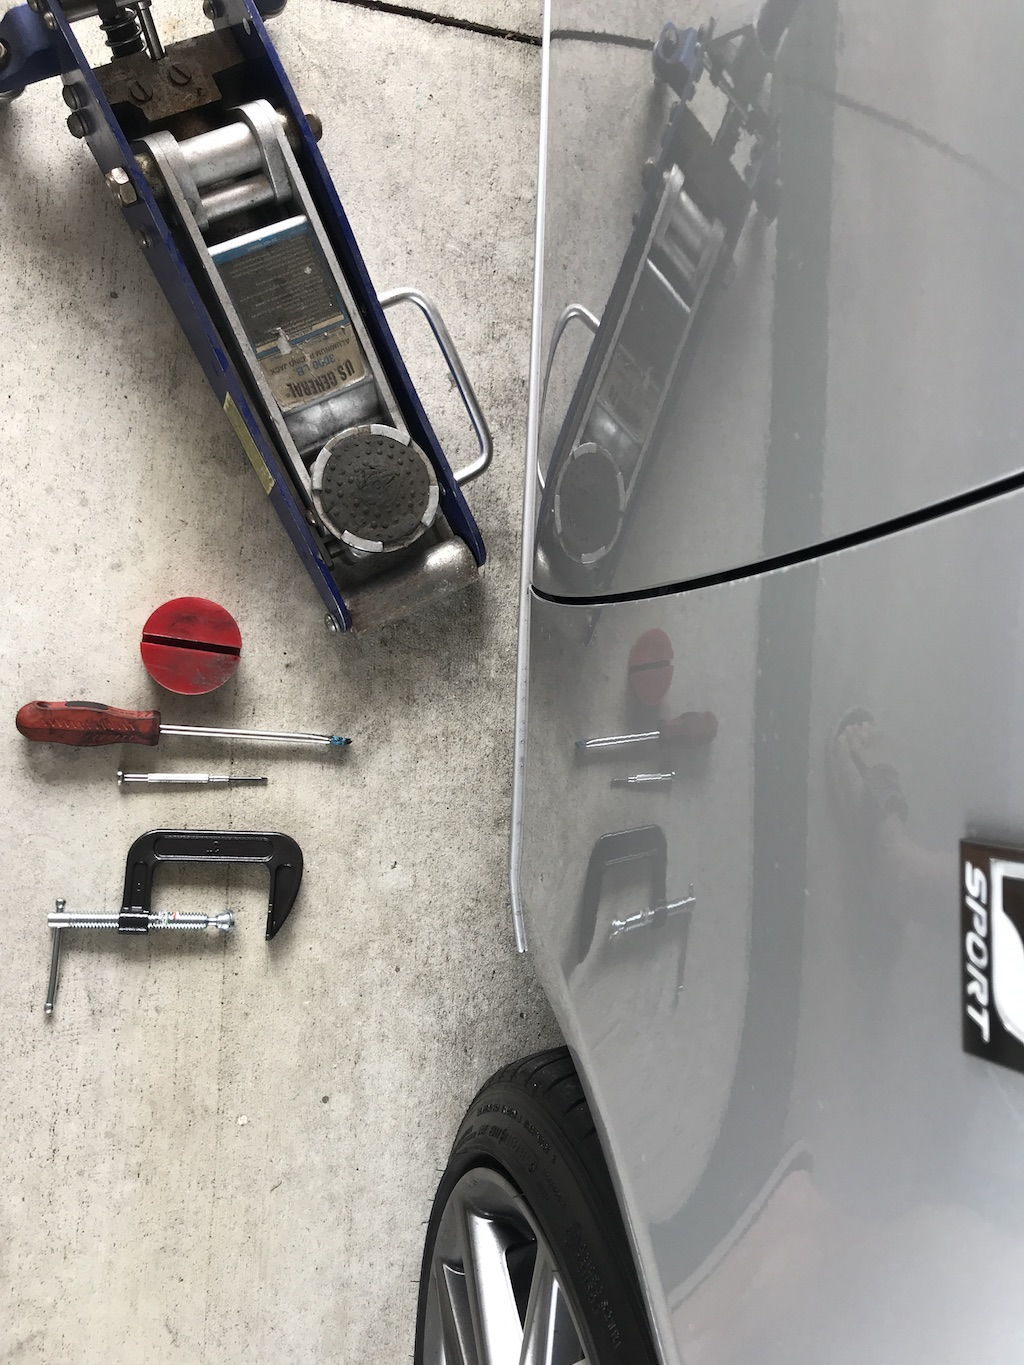
Tools you'll need for the job. Yep that's it! I didn't even use that big screwdriver. Set the parking brake before lifting the front. This job is too easy. Also NO Need to turn the wheel or any of that non-sense.
The job is easy enough keeping the wheels straight. You don't want to turn the wheels when the car is lifted anyway, can be dangerous.


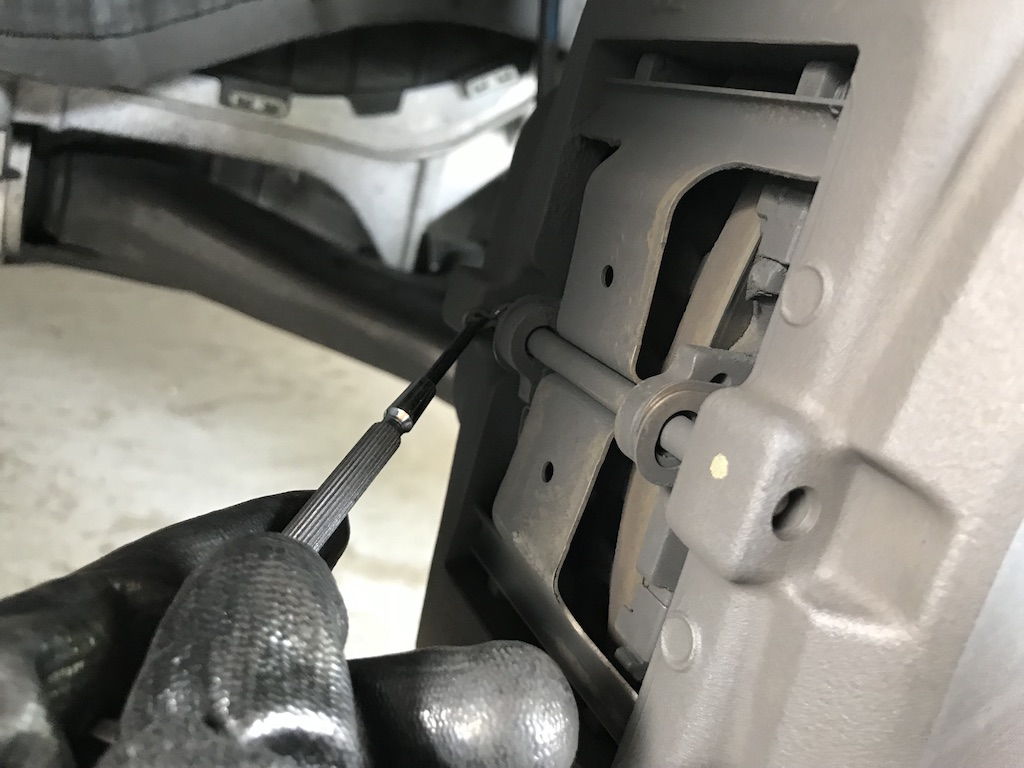
Use jeweler's screwdriver or other small tool to easily pull out pin. Comes out with minimal force. A baby can do it.


Use a small screwdriver to push the pin out. Again, minimal force by hand. No need to hammer, etc. Use the end of your screw driver to tap it out if you want. Remember to first remove the safety retaining pain.


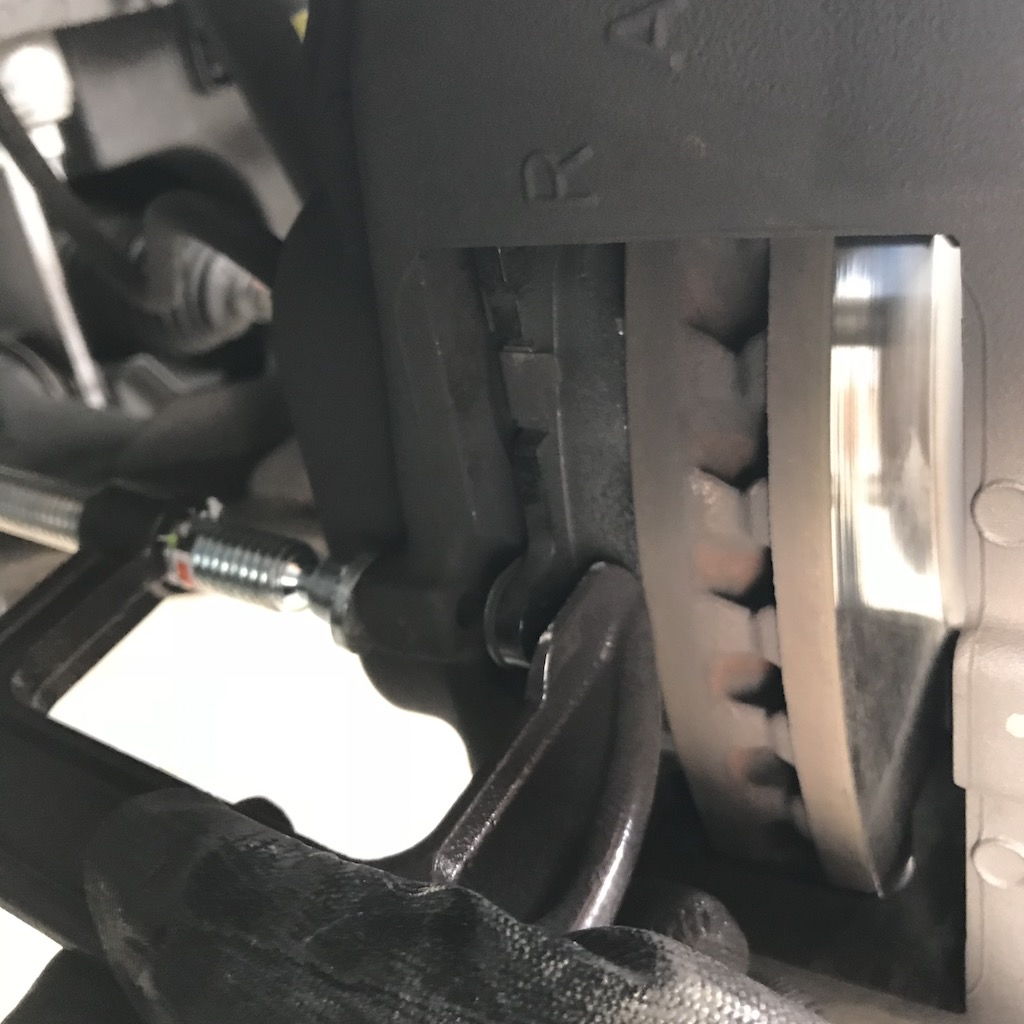
After the retaining pin and retaining plate are out, go ahead and use your clamp and compress the old pad and the caliper together on the nubs shown in the photo. You are pushing the piston back in to make room for the new pads. Don't worry about getting it perfect, just enough to get the old worn pads out. Very easy.


Do the same for the inner pad. Pull the old pads out by hand. Easy.


Removing the old pads


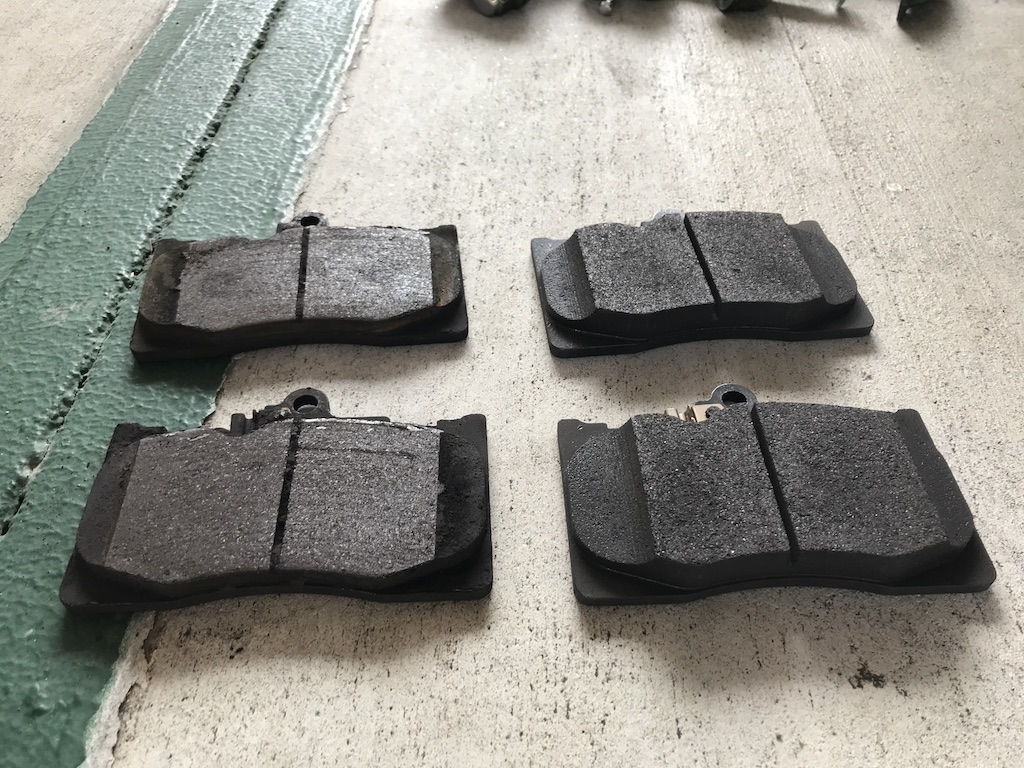
Old pads left at 11,100 miles. About 4mm left. The metal wear indicator had not yet hit the rotor. On the right are factory Lexus replacement high-friction pads. $55. The pads with the metal indicators were on the inside so I replaced them the same way. I don't know if it's a huge deal that they go on the same way, but I did in anyway. Maybe the inside pads wear faster.


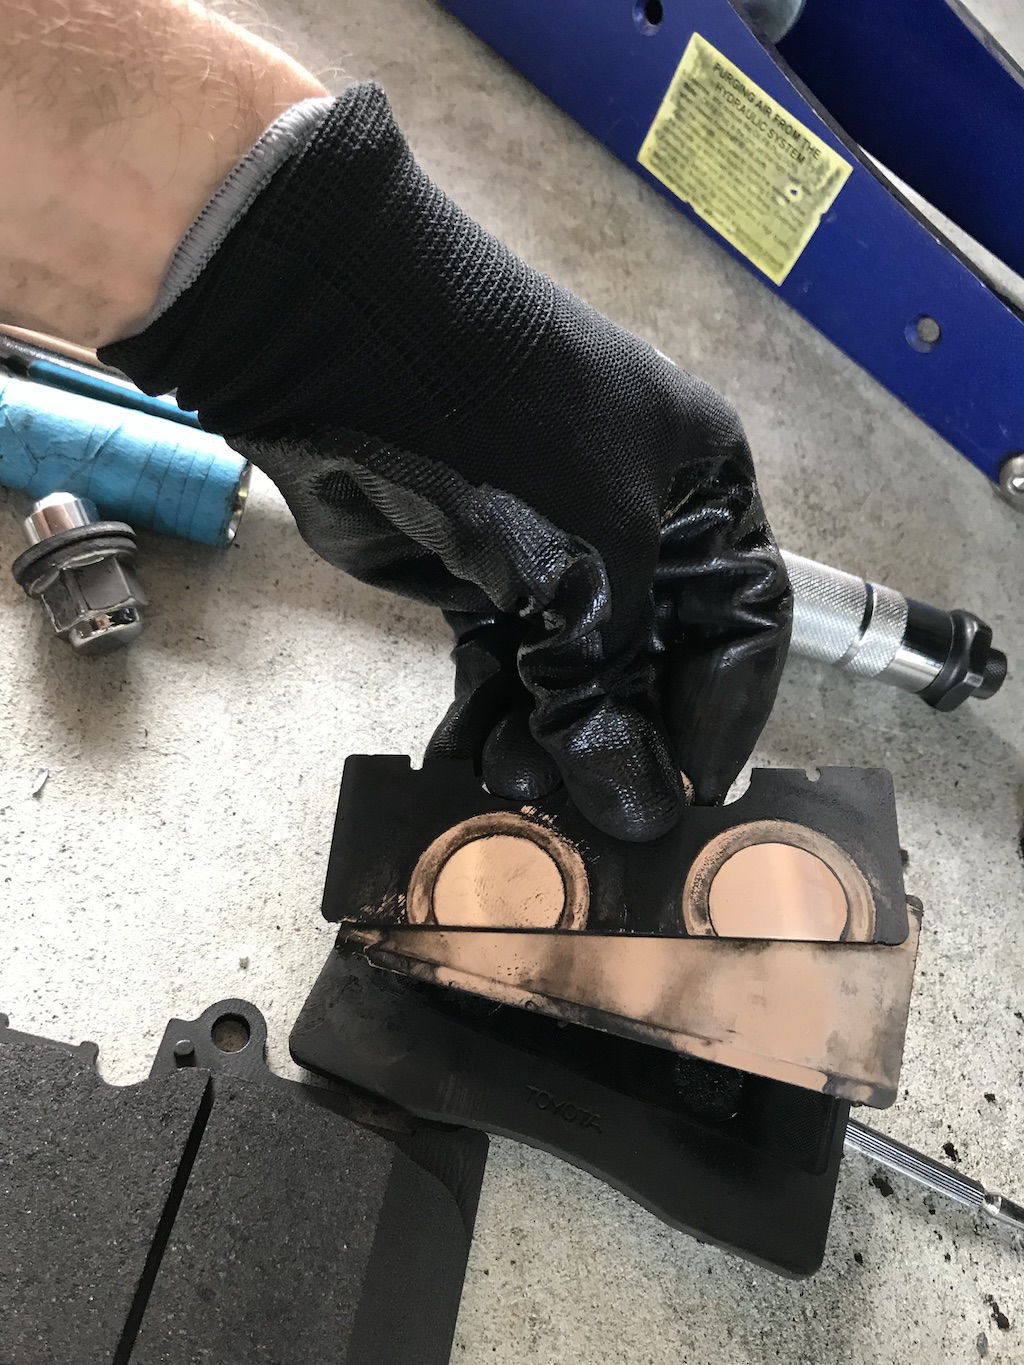
Once the pads are out, remember to remove the old shim plates (two per pad) and transfer them to the new pads.


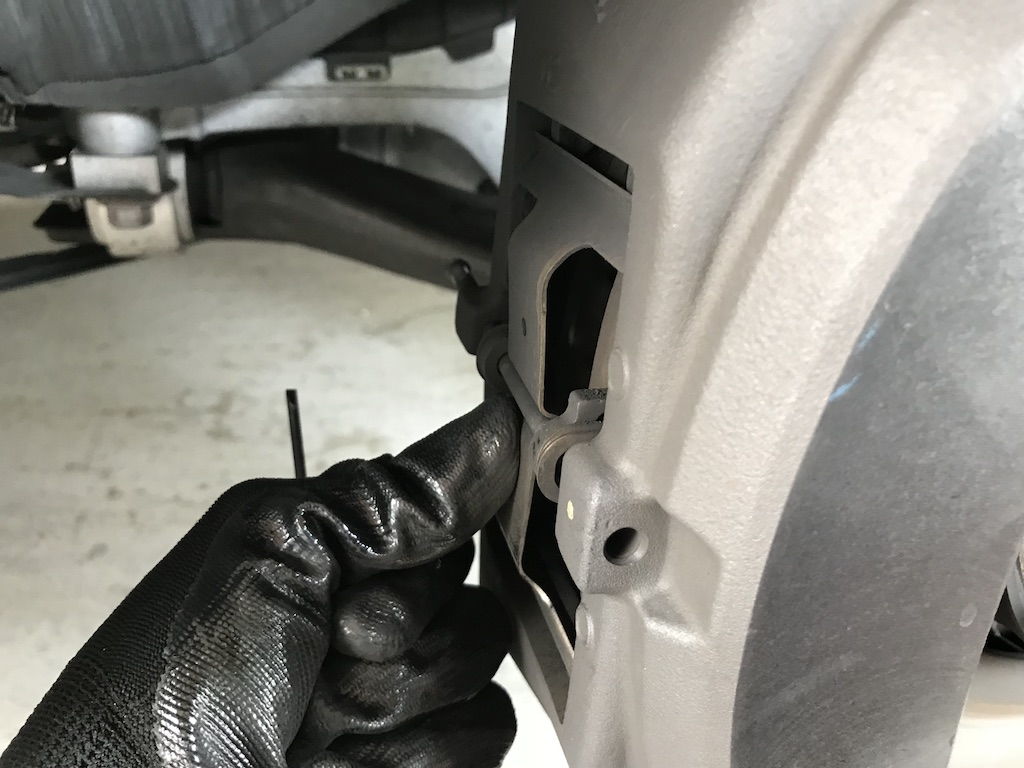
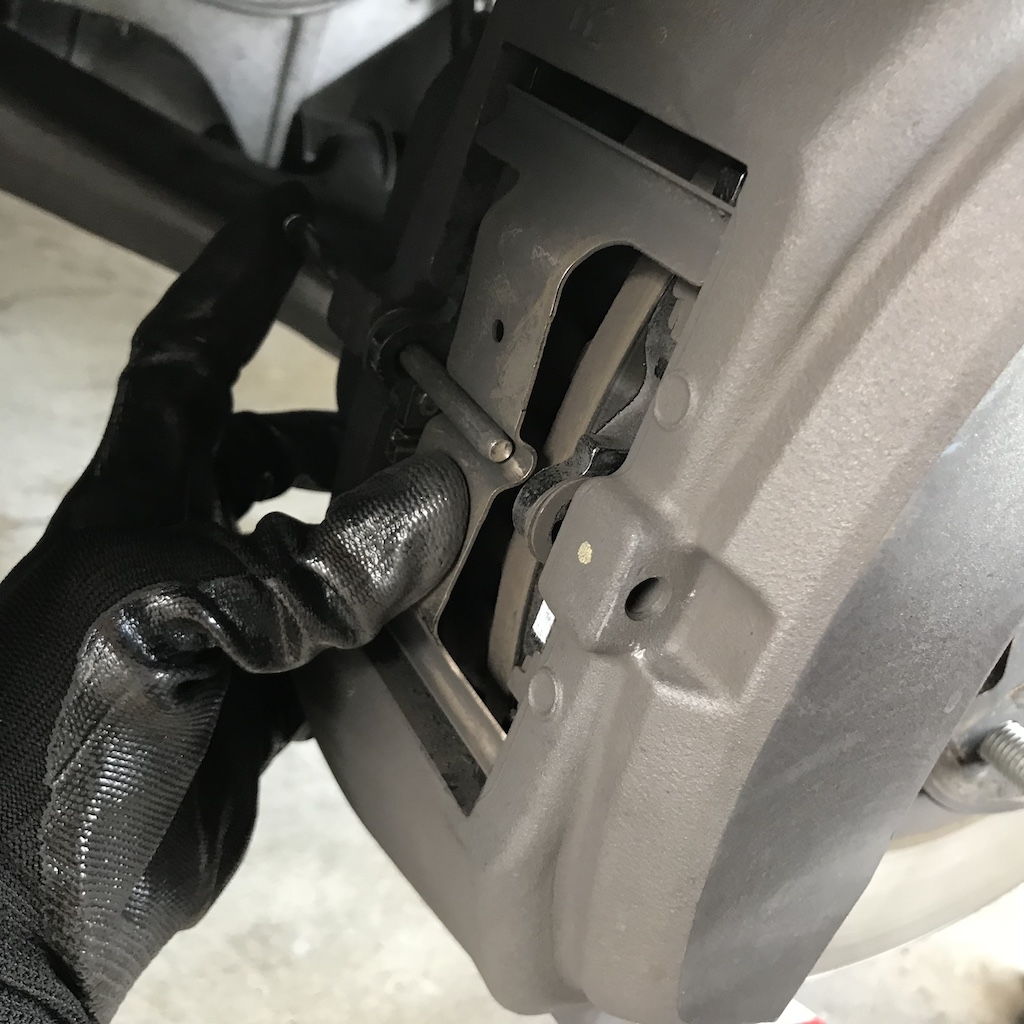
The new pads slide in easy. If you are having trouble because there's not enough room, slide only the NEW inner pad in and use your clamp to compress the inner pad to give you a bit more room. Both new pads should drop right in with minimal fuss. Place the retaining clamp then use your hands to slide the retaining pin in. Minimal pressure is necessary. No need for hammers, etc. Lexus made this really easy to service. Don't forget to reinstall the little tiny safety pin. The straight end in.


A pic showing my thumb holding in the retaining clamp as I push the pin in by hand. One-handed operation! Easy! Don't for get the safety retaining pin on the large pin. It's very tiny--don't forget it!


30 minutes later, including cleanup, all-buttoned up. Don't forget to torque your wheels down properly 80 ft-lbs +/-5. I used 81 ft-lbs in a star pattern.

Gloss vinyl wrapping your Lexus trim! Windshield post trim wrap

BLACK GLOSS WRAP

This is how Lexus should've made these cars from the factory but the costs to paint everything out would be quite a bit. The vinyl is SUPER cheap and easy to do with practice and best of all, instantly reversible.

Episode 7 of "The glossed series."

I set out to gloss out every flat unpainted plastic trim. I think flat plastic looks cheap and is cheap. Manufacturers do this to cut costs. Put it this way, you won't find any flat unpainted plastic on an S Class or even some Lexus models.

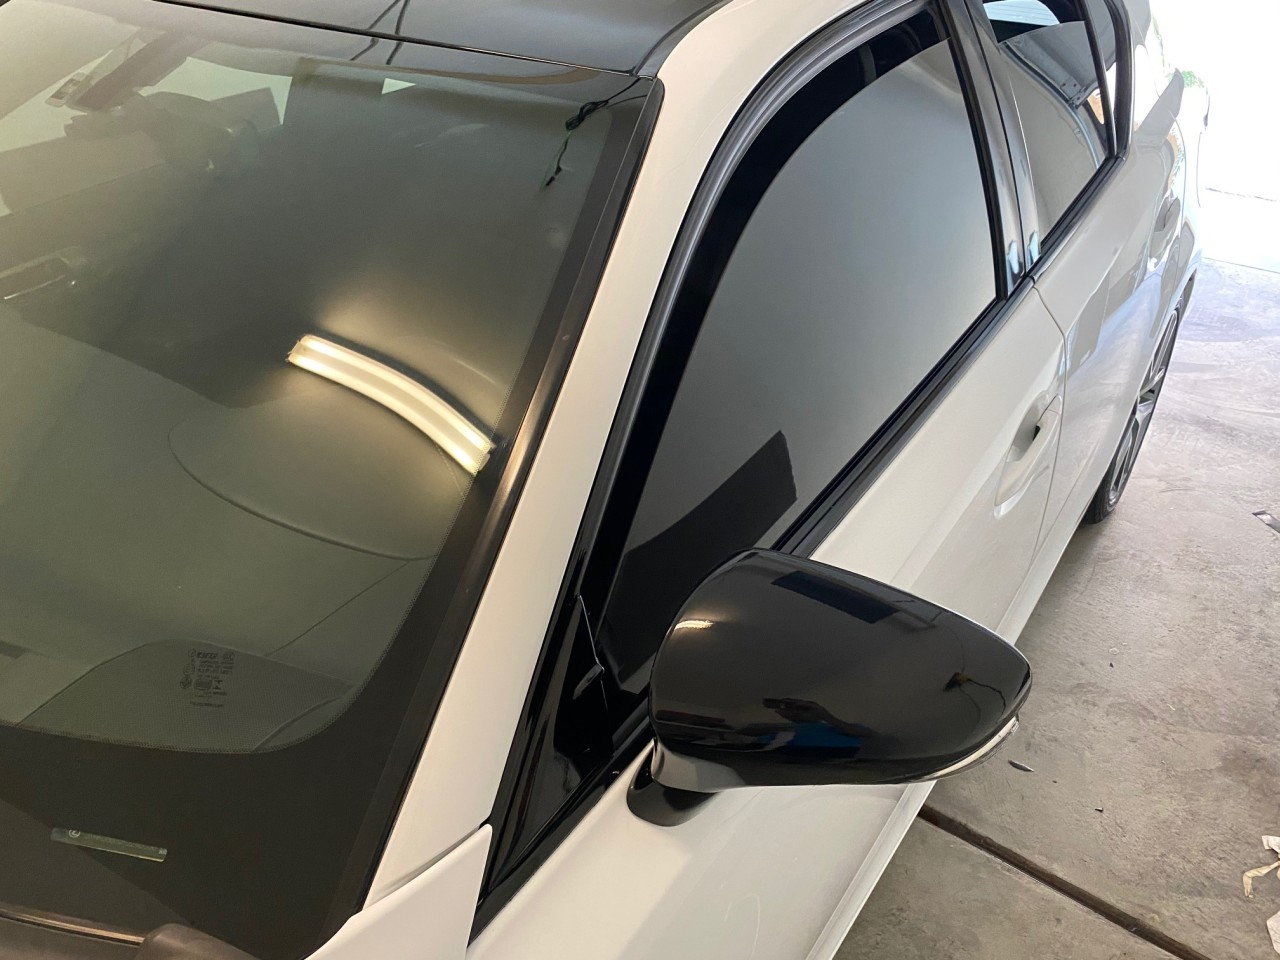
Anyway I thought about this for a while but never got around to it. I wondered why i didn't do it sooner. I glossed out my front windshield post trims. It took literally 3 minutes per side. Lay a strip of vinyl, press it out with a wrap glove, and cut with a razor blade (sharp purpose made crafting blade) and the results speak for themselves.

Here's the vinyl and ONLY vinyl I'll use: https://amzn.to/32P1LFv
The razor: https://amzn.to/2Jrbuu8 (best blade in the industry) don't use any other type of blade, especially those home depot generic ones. you need a precision crafting blade.

It helps to have a heat gun to cement the vinyl down. not completely necessary.

Of course wipe and clean with alcohol -- extremely important.

Here's a before and after shot. Note the plastic trim next to the windshield on the A pillar.

Note my other trim is glossed out as well. same for the A pillar triangle posts, B pillar posts, rear quarter glass strip. Running out of things to gloss. Next on my project are the rear bumper bezels and inner mirror frames. On the Lexus GS, these are painted gloss black and look so good. But the IS, RC, CT (same mirrors) have them in unpainted plastic to save costs. It should be easy to lay down some adhesive promoter, base, and clear over the mirror inners. I may do the entire mirror and remove the vinyl but the vinyl looks good for now. Super glossy nearly like paint.


Yes my lower strip is chipped up. i want to get the stock chrome strip from the 16+ models. it's like $250 though. a hard pill to swallow. waiting for a used one to show up. I may wrap it too but that would require removal of the bumper to do it right. This piece doesn't wrap well due to the curvature.