
SO YOU WANT SOME CHEAP MODS, HUH?
So you're on a budget and want to modify or upgrade your E46, huh? Well instead of going out and buying angel eyes, some Ed Hardy vinyl wrap for your interior trim, or bike racks you'll never use, how bout you check out these mods?
1) HID/Xenon BULBS


2) LED Interior Kit

An LED interior light kit will give your E46 a fresh modern feel and look. Plus they'll use very little power if you ever accidentally leave your lights on. Win/win! E46 interior led kit

3) Rapid USB charger

Your typical cell phone charger has limited output. A rapid USB car charger
 will charge your phone twice as fast. No brainer for when you low on juice. The one linked is the exact model I use. Schoche.
4) WAX, baby

Protect your E46 paint with the same wax Mango uses. None other than Collinite IW 845
 . Used by the US Navy! This is the most durable wax on the market and is VERY easy to work with and provides very durable protection. Some say it lasts up to two years. I still wax my cars twice a year anyway. It's fun!
5) Rogue Engineering Shock Mounts
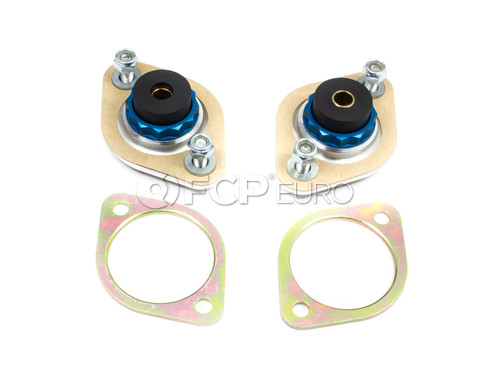
 were installed on my E46 and it means after you install them, you never have to take apart your trunk to change shocks. You disassemble them from the bottom. The shock mounts also serve as reinforcement plates as they sandwich the thin sheet metal of the shock mount tower between two slabs of high-grade aluminum. Awesome!
 6) Front Strut Tower Reinforcement Plates

Self explanatory. Just as above. E46s very easily mushroom upon pot hole impacts.
BMW E46 Strut Tower Reinforcement Plates are a must on ANY street driven BMW E46.
7) M3 RTABS

8) M3 Engine and Transmission mounts

Want more response? When you hit the go pedal, rubber gets in the way of how fast you can put the power to the ground. Get OEM M3 engine mounts for quicker response to your inputs. You can get budget branded M3 engine mounts here. This is great bang for the buck. BMW E46 M3 engine and transmission mounts are a direct swap in any E46.
9) Wagner Steamer

I use the Wagner 915 steamer
 , myself. And it's one of the best things you can buy for car... or home! Destroy odor-causing chemicals and years of oil and dead skin that has accumulated in your Bavarian cruiser. Also great for dirty brake calipers, stubborn stains, etc. Everyone always asks me how I keep my E46 looking new and what chemicals I use. My answer is water. And no chemicals. Just add water to the tank, flip the switch to on, and have fun steaming anything and everything for a deep cleansing. Dirt and oil just literally melts away. Wipe down with a microfiber towel
 .
.10) Mobius Dash Cam


Installed into my 2016 Lexus IS
The Mobius Action Cam is by far the best mod you can do to your car. Particularly, your E46. Protect yourself from people who brake-check you causing you to rear end them or if you rear end someone at very low speeds and blame you for pre-existing damage. This recently happened to me and the person tried to bribe me for money telling me I had caused the damage to their car when I lightly tapped their bumper and no damage was on my car. Little did they know the whole event, including the damage to their car, was being recorded in HD 1080p video. The look on their face when I pointed out my dash cam was priceless. You'll need to wire it up to your 12V power supply in the sunroof panel area. Just use a voltmeter to source power. You'll also need a 12V to 5V DC converter
 . Not a big deal. I also recommend a Mobius Action Cam helmet mount
  to mount the camera discreetly. Not necessary but recommended. Also install the Mobius Action Cam Capacitor
  so the camera properly turns off when you turn your car off and is able to save the file properly. Lastly, a right angle mini usb cable to supply power to the camera. Cheap stuff. Consult an automotive professional for help installing if necessary or your skills arent great. Easy to install though! It turns on and remains on whenever the ignition is on and records and loops over the oldest footage. Depending on memory card you use, you can get about 5-10 hours of video non-stop, uninterrupted. I also recorded a dealership doing some very bad things to my car (my non-BMW hybrid) and some other valet drivers. Can't say enough good things about having a dash cam. EVERYONE should have them in ALL cars. I feel naked without it.
11) Mityvac Oil Extractor
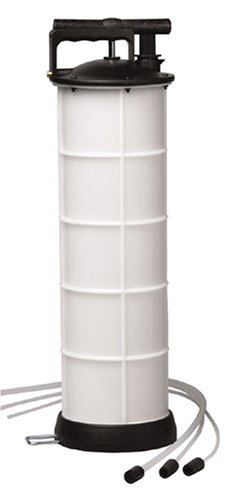 The Mityvac Oil Extractor is a lifesaver--literally! Ever wanted to change your oil with white gloves on? This allows you to change the oil in your E46 (and most other cars) without even having to lift the car! The Mityvac Oil Extractor works by pumping the the vacuum by hand and lowering the supplied hose into the dip stick tube which leads to the bottom of the oil pan. The oil is out within a few minutes. Then you can pour into bottles and recycle at your nearest oil recyling facility (usually your local autoparts store). No need to fumble around with jacking the car up and risk stripping your oil pan bolt. Now some say they feel better draining oil the old fashioned way to get out all the gunk. Since this hose goes to the bottom of the oil pan, this IS getting out all the gunk -- you'll see it at the bottom of the reservoir. With your oil filter on top, oil changes have never been so easy-- or fast!
is by far the best mod you can do to your car. Particularly, your E46. Protect yourself from people who brake-check you causing you to rear end them or if you rear end someone at very low speeds and blame you for pre-existing damage. This recently happened to me and the person tried to bribe me for money telling me I had caused the damage to their car when I lightly tapped their bumper and no damage was on my car. Little did they know the whole event, including the damage to their car, was being recorded in HD 1080p video. The look on their face when I pointed out my dash cam was priceless. You'll need to wire it up to your 12V power supply in the sunroof panel area. Just use a voltmeter to source power. You'll also need a 12V to 5V DC converter. Not a big deal. I also recommend a Mobius Action Cam helmet mount to mount the camera discreetly. Not necessary but recommended. Also install the Mobius Action Cam Capacitor so the camera properly turns off when you turn your car off and is able to save the file properly. Lastly, a right angle mini usb cable to supply power to the camera. Cheap stuff. Consult an automotive professional for help installing if necessary or your skills arent great. Easy to install though! It turns on and remains on whenever the ignition is on and records and loops over the oldest footage. Depending on memory card you use, you can get about 5-10 hours of video non-stop, uninterrupted. I also recorded a dealership doing some very bad things to my car (my non-BMW hybrid) and some other valet drivers. Can't say enough good things about having a dash cam. EVERYONE should have them in ALL cars. I feel naked without it.11) Mityvac Oil Extractor
Any questions, please feel free to ask! Buy, use, or install any of the above on this post or on any post on my blog at your own risk! Have fun, and be safe. And thank you for using the links on my site. It helps me help you. Appreciate it!
I ask that if you shop on Amazon, save the following URL to your computer browsers to access Amazon. It helps me out and I get a few pennies for each item you buy! https://www.amazon.com/?ie=UTF8&tag=il734-20


 with tremendous results. Make sure you use a quality automotive
  before you polish or else you'll just be polishing whatever grit is on your paint into the clear coat!
  If you have your own water connection, I highly recommend a high pressure washer like the
  Yes proper car care can be pricey. Your local coin-op car wash works fine as well.
  and a
and a  and scrub your car by hand.
 clay bar (medium). Yes you notice a trend here. Chemical Guys make some damn good affordable car care products. You'll see though I'm not exclusive to Chemical Guys. I'll recommend non- CG stuff later on in this article.
 You can also use
  and water. After you are done claying your paint and glass, give the car yet another wash and rinse. Yes this is going to take all day.
 to the paint and assess whether or not you have enough clear coat first! You do not want to correct a car with failing or thin clear coat.
 These are intended for light to mild corrections. This will do fine for most peoples needs. Of course you'll need appropriate pads and polish to attack those swirls safely and effectively. If you feel unsure, seek a professional's help. Never attempt this if you don't know what you are doing.
 This stuff is awesome. It's known for it's stellar durability. Nothing touches it as far as durability is concerned. Very easy to work with and comes off very easy. Let it sit for at least half a day to a day before removing it for best results. Use it on glass and wheels as well. This is my preferred and only method of sealant. Sometimes if I have time, I'll throw on two coats. Use it with


 Once you've done all the above, it's VERY EASY to maintain your paint! Pressure wash regularly and then use a quality microfiber and detailing spray like
  to give the paint a nice glossy sealed finish then wax with a coat of
  twice a year.
 I can't tell you how much I like this steamer. Nothing better to strip off odors, bacteria, gunk, grime, grease, etc with steam. You'll literally see black water dripping off whatever you are spraying the steam onto. Stereo buttons, leather seats, dashboard, door panels, anything and everything. Of course use it wisely and don't direct steam into any electrical/screen areas for too long. Simply apply the steam to whatever you are trying to clean and wipe off with a microfiber. Repeat if stains are stubborn.
 It cleans and protects. It's like a good finishing touch/detailer/maintainer for your interior. You can also use a damp cloth if you wish. But this stuff is the same company that makes BMW's car care cleaning products.
 . Use it to condition (after cleaning of course) door seals, trunk seals, all rubber and trim.
  .
.  I don't I feel that's just oil people cake on to give the appearance of black. I've only used one thing to restore interior trim:
  This is a micro-abrasive so be careful around painted surfaces. Use painters tape to mask off painted areas you don't want to scratch. This will literally scrub off all the white haze that's accumulated on your trim for years. People ask me how my trim looks so factory new and deep black. This is the secret. It's been picked up over the years and becoming popular. Of course if you want your trim extra black, I suppose you could use

 . As for tires,