BLUE F SPORT SPRINGS
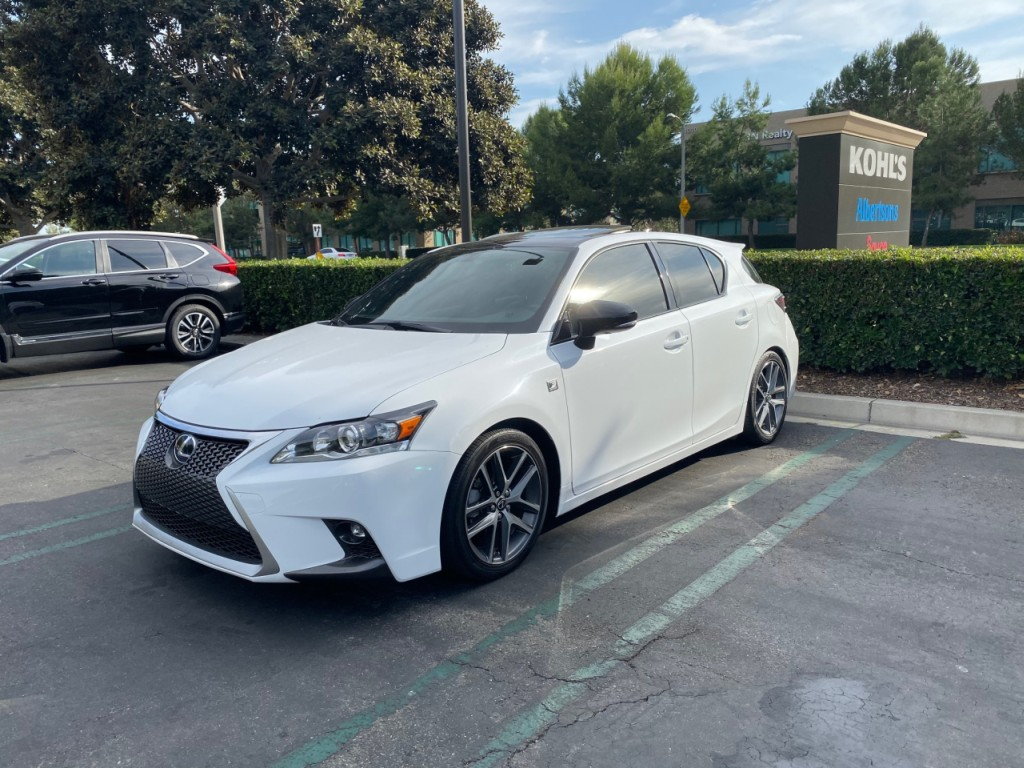
I wanted to create a guide to assist in the installation of the blue F Sport springs. They provide a 1" drop. Part #PTR07-77110. The ride is slightly firmer than stock, but still very comfortable for a daily driver. Below, installed on my 2015 F Sport. This is for the dealer *OPTIONAL* Lexus brand BLUE F Sport springs. They are an upgrade over the factory installed BLACK F Sport springs.

I purchased mine from eBay from user Bell Lexus North Scottsdale. These guys are always fast and great and go the extra mile to help you. Response time is lightning fast and thorough should you need anything. Not sponsored in any way by them nor was I asked to endorse them. They just did a great job and I thought they deserved a shout out. If you google the part #, they're actually a bit cheaper elsewhere from other dealers on the web. There's a sale going on right now.
There's tidbits of information out there, but nothing collective all in one place. So that's what I set out to do with the creation of this thread.
This is a guide only and if you are incapable or not confident, you should consult a professional to perform the work. But as many of us are enthusiasts, some may feel up to the task. If you have proper equipment and tools, exercise good safety measures, and work with a friend to help you, this job is not too difficult.
I did this in my garage with the following tools. They are not ALL necessary, but it helps to have all of these. I've provided links to some of the specialty tools that I actually own and have used in this project. The others are basic tools and you can find them at your local home depot or wherever you get your tools. Harbor Freight is decent for home projects too.
Safety glasses
Low profile jack (got mine from Harbor Freight)
Quality steel jackstands
Ramps
Breaker bar (1/2")
Torque wrench (1/2") capable up to at least 177 ft. lbs
Ratchet 3/8"
Ratchet 1/4"
Ratcheting wrench 14mm
Sockets metric 10-22mm (off top of my head, you'll need 13, 14, 17, 18, 19, 22) but you could need the other sizes, I forget. Just have a decent set. The bigger ones, I recommend 1/2" drive, but you can use a step down adapter if needed)
Front Struts
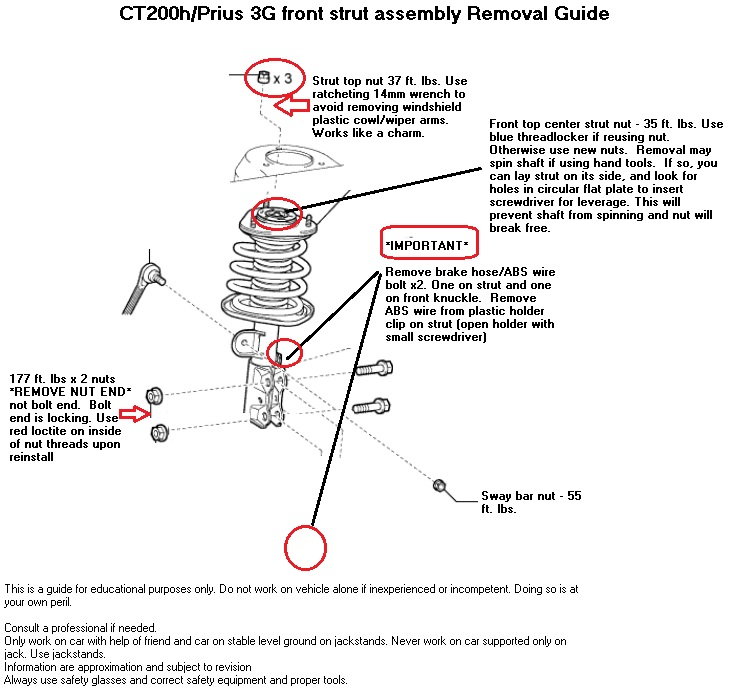
I created this hand drawn diagram to aid in front strut installation and removal, as well as the rear shock removal and install. All the important parts required for removal of the strut assembly are outlined in red with important notes. So I'll just give some general advice.
You cannot work with one corner of the car lifted up only cause the sway bar. If working on the front, the WHOLE front needs to be lifted off the ground. Same goes for the rear. So get your jackstands ready.
You do NOT need to remove the front plastic cowl and windshield wipers for removal of the strut. At least not in the CT. The Prius you may. On the CT, the strut nuts (3 per tower) are removed using a ratcheting 14mm wrench like this one. This alone will save you a good chunk of time. Other guides have you remove the cowl.
I found my swaybar nut to easily remove and I did not need to hold the shaft in place w/ a socket. It also easily tightened. Your experience may be different, so have a hex head socket and ratchet ready in case it spins in place.
Removing the center strut nut... you should use an impact to easily remove this. I did not have one so I used hand tools - 19mm socket and breaker bar. I found of course my shock shaft to spin. Close inspection of the circular flat plate at the top spring coil reveals holes. Pull the rubber back and you'll notice them. You can stick a screwdriver inside and use it for leverage. Nut removed easily at that point. Obviously before you remove this, make sure your spring is compressed so there's no pressure when the nut is removed. Failing to do so can result in serious injury. When removing the strut mount/top nut, always make sure you point the strut *AWAY* from you at the wall or something similar. I always find it good practice to cover the area with a heavy blanket, box, or other object as to protect yourself. If you compress the spring enough it shouldn't be a problem.
Personally, using these exact high quality spring compress sticks, I found I did NOT need to compress the spring a whole lot to relieve tension. My experience was that when the top coil spring was at least partially lifted away from the rubber (you'll see dark/clean rubber) then at least enough tension was off. The top nut came off easily and the top mount did not pop off with any pressure. Always coat the spring compressor threads in motor oil as well as the top washers. you want any metal metal area under load to be coated in oil so it turns easy and does not create too much friction and heat.

Rear shocks
The rear shocks are pretty easy. Follow my notes on the diagram below.
Important notes:
It's important the inner control arm fastener is loosened, and not removed. The arm needs to pivot. You can severely wear or tear the bushing if you leave this fastener tight as you pivot the arm down to remove the spring. You must also re-tighten the bolt as the VERY VERY last step. The car must be up on ramps on its own wheels at its natural resting position. Otherwise you can and will wear or tear the bushing if you lock the bushing then put load on it. I drove the car back and forth a few feet a few times and bounced the car so it can be as close to naturally resting as possible ONCE up on ramps. Let the car settle.
The rear sway bar only needs to be detached from the control arm at the very bottom of the control arm. Do not touch anything else on that sway bar including the nut above it. The nut sandwiches the rubber bushing above it. Make sure you reinstall that the same way it came out. Easy.
Be careful not to load up the shock (stretch). So remove the shock bolt first. You will need to place a jack under the control arm and lift it (slightly) to take load off the shock so the bolt slides out easy. Same for the control arm.
When reinstalling the bolts, again you'll need to use a jack to get the bolts to line up. You can use a screwdriver to stick inside the hole and maneuver/wrangle the suspension so the hole accepts the bolts. I found it to be easy on this car. Other cars like the Lexus 3IS... not so much..
It is advised to get an alignment after you do install springs or front dampers.
Everything you need to remove for rear spring replacement is circled in red below.
Consult a repair manual for accuracy before proceeding on your own car. This is just a guide for information purposes and to assist and educate others. Information contained herein is not guaranteed in any way nor is it promised to be accurate and is subject to correction or revision.


No comments:
Post a Comment
Let Mango know what you think!