Thursday, November 16, 2017

Mango's E46 BMW Cooling System - E-Store 11/16/17 - Complete Parts List

Mango's Cooling Parts E-Store - BMW E46 Manual Transmission (323/325/328/330)


Welcome to my "e-store" page where I'll conveniently list where to buy all your BMW E46 cooling parts.  Some enjoy the no-hassle Amazon prime service and I personally use Amazon.  Your using these links is greatly appreciated and earns me a few cents for every dollar you spend and doesn't affect you at all. It helps me run this site, pay hosting fees, and keep on helping you.  Appreciated!

The parts on this list includes everything needed to properly refresh your BMW E46 cooling system.  Easily installs in 3-4 hours with basic hand tools. Make sure you read my cooling page here for important information you'll need. 

For best results, open in a new page, add to cart as necessary, and return here for the remaining part links. Items for automatic transmission models are highlighted in RED.

All items are OE/OEM at time of posting unless otherwise noted. Confirm before buying. Make sure you buy all 17 parts -- or 23 if you have an automatic ;)  The weakest link in the chain will bring your entire car down.  So do it all.

All items are Amazon Prime - Free Shipping where possible! 


1) Radiator
link to buy (Manual transmission)
link to buy (Automatic transmission)
2) Expansion Tank
3) Expansion Tank Cap
4) Water Pump
5) Radiator Hose Lower
6) Radiator Hose Upper
link to buy
7) Expansion Tank to Pipe Lower Hose (VERY important)
link to buy
8) Thermostat
9) Radiator Fan Switch
10) Water Pump Pulley
link to buy (URO Aluminum)
11) Coolant drain crush washer at engine-block
12) Water pump pulley bolts (You can reuse these if you are careful)
13) Belt Tensioner Pulley (Main central pulley)
14) Alternator Deflector Pulley
link to buy
15) Coolant
link to buy
16) FOR MANUAL TRANSMISSIONS - Electric Puller Fan - OEM/CoolXpert
link to buy
A/C PULLEYS (See here for more info)
17) A/C Tensioner Pulley - Mechanical
link to buy Dayco 89133
or;
17) A/C Tensioner Pulley - Hydraulic
link to buy
18) Alternator/accessory belt (Main large drive belt--The same across all model year cars)
19) A/C belt (Differs dependent on your build date--see below)
link to buy (5-rib production date up to 9/2002) 
or;
link to buy (4-rib production date from 9/02)
For Automatics:
20) Automatic Transmission Expansion Tank Mounting Plate (Again, optional--you may reuse)
21) Automatic Transmission Thermostat (often crumbles apart upon removal of original--DO NOT GET CAUGHT WITH YOUR PANTS DOWN ON THIS--REQUIRED FOR AUTOMATICS)
22) Automatic Transmission Fan blade (Optional yet recommended)
23) Automatic Transmission Fan Clutch (Optional yet recommended)
24) Automatic Transmission Cooler O-Rings. (Highly recommended as the old ones tend to not seal the same) Order two of these for the transmission cooler.

Saturday, November 4, 2017

Apple iPhone X Review- Second to None

iPhone X
The Platinum Standard


The moment the iPhone X pre-order went live, I pulled the trigger - 12:00AM sharp.  No regrets since. Literally minutes after I ordered mine, all websites around the globe were sold out.  Apple and all the major carriers.  


If you're reading this review wondering on whether or not the new iPhone X is worth it - I'll save you the time.  It is.  Go buy it now.  Or, if you can wait, go to Apple.com.  Currently the phone is back-ordered for several weeks to months.  


You own the old iPhone 7+ which was already the standard of the world, and you're wondering if the upgrade is worth it.  Well aside from the resounding yes I'll say, I can sum up real-world reasons why.

Do Less with More

The iPhone X, believe it or not, is around the size of the regular smaller iPhone 7, but has a larger, better screen than the iPhone 7+.  The folks at Apple pulled off some serious NASA-grade engineering tricks to jam pack all the goodies needed to trounce the iPhone 7+'s performance (which was already 50-75% faster than the fastest Android-powered phones and STILL IS today) into a smaller form factor. From crazy dense double stacked IC boards, to an ultra compact sensor-array, to a special form factor dual-cell battery, the new phone has plenty of tricks up its sleeve. After just minutes of using the new phone, the old 7+ felt like an absolute dinosaur to hold, use, and experience.  The new phone has a light-on-its-feet feel the old phone just isn't capable of.  If I had to sum up the new iPhone in one word, it's: efficient.   

Using it

The new phone has a learning curve.  I predicted years ago the removal of the physical home button.  And it came true.  Apple has refined the user-experience in such a way where it keeps the primary way you use the phone (swiping) as its sole method of interaction.  At first it takes getting used to after a decade of pressing a home button, but soon comes second nature as swiping up to "go home" is just another swipe--something you do anyway to access countless other gestures/features.  Swiping up is natural in that it's as if you're saying "I'm finished with this app now, take me home" vs lifting your finger and pressing down using your thumb.  It's natural and more fluid. I like it.  Face ID is another user experience.  Double tap the side button and bam, as long as your face is in the general area, your payment is automatically done.  I've used it a couple times and it's more natural than touch ID.  Double tap and you're done.  

The Screen

OLED.  Deep blacks, more pixels, ultra clear.  It's also very cool to have extra real estate up top, say when watching YouTube, the time and battery is displayed.  No more losing track of time.   The old screen looks and feels like 2012.  No longer.

Other Tips/Tricks and Goodies

Fast Charging/Wireless Charging
Image Stabilized DUAL cameras
Improved LED flash
Improved iOS with a ton of gesture control/updates
Accessibility--you have to enable reachability in the menus through accessibility.  You simply swipe down on the bottom bar and the screen juts down to access things on the top--great for one-handed use.
Animoji--Fun animated emojis that read your face and mimic your expressions as you talk! Send fun messages to your loved ones


These photos were taken with my Canon EOS M3 and Rokinon 12mm 2.0 lens

iPhone X on the left vs old iPhone 7+ on the right

I haven't tested it fully yet but I will soon. Here's a pic I took of a dog using portrait mode:


ACCESSORIES


(Spigen Thin Fit iPhone X Case)

Spigen Thin Fit Sleek iPhone X Case

ESR iPhone X Clear Flexible Case

Skonyon Clear Hard iPhone X Case

Qi Wireless Charger

Lightning Headphone Adapter

Lightning Cables

Lightning Car Charger

Thank you for your support using my links. I earn a small amount when you use them and it doesn't cost you a penny extra! Truly appreciate it!

Wednesday, October 25, 2017

Canon 16-35mm F4 IS Review and Sample Photographs

Canon 16-35mm F4 IS Lens Review
The Best Ultrawide Lens this Generation Will See
Photo courtesy of me

77MM filters
616 grams (very light)
 Weathersealed
Image Stabilized

I've been a Canon DSLR shooter since 2005.  I've used all the ultrawides since the Canon 17-35mm 2.8 to the Canon 16-35mm F/2.8 II.  All were good, but lacking on the borders and corners.  All that changed in 2014 when Canon launched their 16-35mm F4 IS.  It's as optically perfect as you're going to get from 16 to 35mm.  After exhaustive and thorough testing both on charts and in the real world, I can tell you that Canon engineers optimized this lens for 16mm at F4.  On the long end, it's great wide open, but superb stopped down. And I don't use any of these terms loosely. This is a stellar performing lens.  And it works superb on crop-sensor cameras too--which truly shows off Canon's engineering because rarely do full frame lenses perform stellar on crop sensors due to magnification of a small portion of glass.  

Size and Weight

The Canon 16-35mm being a full frame lens is quite large, but at least it's light.  It feels light and airy, but solid and rugged at the same time.  You feel confident using it.  It doesn't feel quite as solid as older all-metal versions, but it's not necessary due to modern engineering plastics.  If you have a DSLR, you already in large-size territory so don't sweat the size of this lens. Just grab it and go.  Well-captured memories never regret the extra size and weight needed to preserve them.  If you want, the Canon 16-35mm F/2.8 III features identical optical performance as this F4 version, but costs more and weighs more.  Use this F4 version to shoot things that hold still or use the 2.8 version to shoot things that move (in low light).


Weathersealing

Canon boasts their latest generation of weather sealing on this lens--sealing is completed when you fit a 77mm filter to the end of it.  I recommend a B&W 77mm UV filter for protection and near 100% light transmission.  I've shot in pouring rain all over the world with varying humdity and never had any problems.


Optical Quality

By far, the best.  Not only the best from Canon, the best period.  This lens rocks where you need it most and that's wide open at F/4 @ 16mm and at all ranges.

Shot at 24mm F4


Great for environmental people shots, too!

Unique Perks

Most lenses, including Canon's own and even newer generation lenses don't perform optimally wide open.  This lens does.  Razor sharp out to the extreme corners wide open at 16mm.  Why is this a unique perk? Well in addition to being inherently sharp wide open, when you combine that with the built in image stabilization, you can get museum-grade shots without using a tripod.  I shot in some quiet churches in Europe and at The Shard skyscraper in London--two areas where tripods were prohibited, and I came out with some shots that would be impossible without this lens.  Hand-held for nearly a second wide open, you can shoot at ridiculously low ISOs where every other tourist is shooting at 56k ISO because they don't have a tripod or a lens with IS.

No tripods allowed? No problem. Hand-held from the top of The Shard.  Magic of IS and earth shattering wide open performance.


Shot 16mm on crop Canon EOS M3.  (24mm equivalent)


I hope you enjoyed my review of this Canon 16-35mm F4 IS. I appreciate you guys using my links per above--it helps me earn a tiny percentage when you guys make purchases.  Appreciate it!

For inquiries: e46mango@gmail.com

Thursday, October 12, 2017

How I wall-mounted my TV for $20 -- with JUST a screwdriver and my hands.


Gone are the days you needed a $100 TV bracket and a stud finder and a professional to hang your TV on the wall.  I was doing research and found a high quality slim mount bracket for $12 with rave reviews on Amazon.  TWELVE DOLLARS.  What?!  So I thought... OK.  I'll need a stud finder and drill to mount this bracket to the studs--I've been through this whole ordeal years back when I mounted my 85-lb plasma.

Well, nope! Not anymore.  They make these new fasteners called Toggle-Bolts.  My friend who does home theater systems for a living recommended them and said they don't even need to go in studs these days since new TVs are so light.   The new 43" Sony 4K LED TV I just bought is light as a feather--hell the stock stand it comes with is made out of flimsy plastic and it holds the TV.  The TV is about 20 lbs but Toggle-Bolts says it can securely hold up to 80 lbs simply just using the drywall.

The best part of Toggle Bolts? You don't even need a drill.  You use your hands. It has a built in sharp edge that cuts through the drywall with a twist of your hand.  Just twist it back and forth and it makes a 1/2" hole in the drywall.  You insert the toggle bolt and pull it back firmly securing the anchor to the backside of the drywall.  You then push the plastic cap over the hole and twist the carcass of the toggle bolt off.  Voila.  Then you screw on the bracket.

Oh and onto the bracket I got.  It's made of strong steel--probably made in China but very secure and easy to mount.  Screw the supplied brackets onto the back of your TV using the assortment of fasteners and washers it comes with and you hang the TV on your newly installed bracket. Oh and this bracket comes with a bubble level.  They thought of everything.


After the anchor is pulled tight against the back of the drywall and the threaded receiver is flush against the wall facing you, you push the plastic cap into place and you are left with this.  Simply snap it off with your hands and you end up with what you see on the right. Two done. 


 See. You just use your hands to drive the toggle bolt through the wall.


Install tips:

Toggle bolts: use an LED flashlight to ensure the threaded screw receiver is facing you directly flush against the back of the drywall. So you can easily thread the screw. To know where to put the Toggle Bolts: stand or sit wherever and however you'll be using your TV and what I did was make sure the center of the bracket is eye-level with how you'll be watching your screen.  Use the supplied bubble level that sits on the bracket and use your screwdriver to twist little marks/holes in the drywall where you'll be installing your Toggle Bolts. Oh and don't forget these to hide your wires.

Bracket: self-explanatory, but the way it hooks on is you pull the cloth straps on the top hooks of the bracket on your TV as you hook the BOTTOM of the TV up against the bracket then the top hooks on, then you release the hooks. Easy.  So bottom then top, then RELEASE the cloth strap/hooks.

Use this resource as informational tool only. If your TV is big or heavy, you should use a stud finder and mount to studs for maximum security.  Only use this method if you feel your TV is light enough.  Always work safe and use safety goggles. 

I thank you for reading my site and using my links.  I earn a few pennies every time you use them and I truly enjoy making reviews of products I actually buy, enjoy, and use.

Wednesday, September 6, 2017

Top 10 E46 Modifications that should be Outlawed!

Top 10 E46 Modifications that should be outlawed!

Of course everyone can mod their E46 how they want, but in my opinion these mods are either poor taste, illegal, dangerous and serve no purpose other than to bro-brag, make noise, cause problems with the law, etc. Others are just really poor taste. I'm sure some are nice people who have these mods but still I stand by my opinion! I would outlaw these mods as they usually take more away then they add! And there's little to no value in them.

1) Loud Pipes and Intakez and Headerz

E46s from the factory have classy, carefully tuned exhausts that make quite a bit of aggressive noise from the factory.  The fact that they make noise, particularly on 330s, means they're not very restrictive.  Unless you drive a dedicated track car, aftermarket exhaust on your E46 non-M doesn't do much for your E46 other than make it loud, obnoxious and improve your 1/4 mile times from 15.5s to 15.458s.  Is that half of a tenth of a second worth it for the $800 for the part (not including install) and $1000 in tickets you'll get? Besides, the stock stuff looks way classier anyway (than a shiny wavy mirrored Wugnaflo) and gives the car a refined appearance--no wonder why BMW chose it!  If your car is dedicated track beast with supporting mods, then sure go for one. But for the street? Why bother. Remove the butterfly flapper on a 330i or get a ZHP muffler and bam. Instant high quality exhaust! And don't get me started on aftermarket intakes for the E46. Stock is the platinum standard.  Aftermarket fits poor, sounds poor, looks poor, and performs poor. This is a fact as premium members of E46Fanatics have confided in me personally. I've helped fanatics remove many aftermarket intakes.  


2) Tint Dark Tinted lights


You aren't batman. The whole point of a light is for light to illuminate so you can see stuff with your eyes.  You know, so you don't hit it.  Painting or tinting your lights is not only illegal and dangerous, but poor taste and lessens your visibility as well as others from seeing you.  For the same reason, lets do away with "stealth" or chrome-coated and blue-tinted bulbs.  Any time you apply paint, you block light. Period.  Yes you can compensate by upping the juice (by increasing the winds in the filament), but the result is increased heat, power consumption, and burnt lights.  Don't pay more to destroy your car.  Besides, amber looks great! Still question this? See California Vehicle Code § 26101-26104.  Don't live in California? Your state has similar laws.

3) Stancing/Stretching/Poking/Tucking


I wrote an article here on why it's bad.  But basically it's dangerous, looks poor, and drastically reduces performance. Don't do it. 

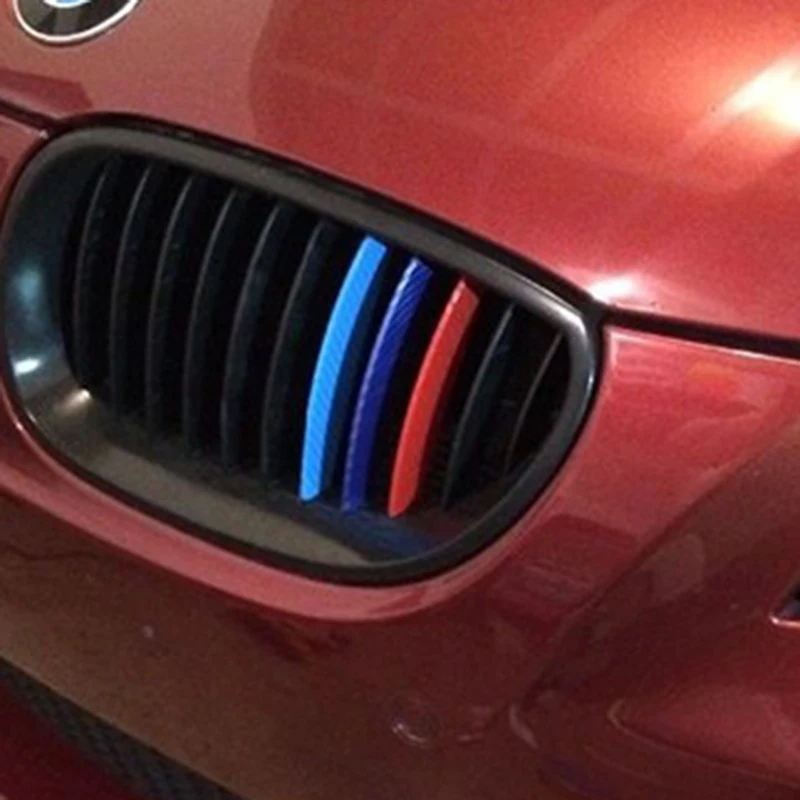
4) Grill stripes


We get it, the company that makes your car has an tough motorsports division and you want to show off the colors on your car like your favorite sports team.  But 1) your non-M is not an ///M and 2, even if it was, people already know it's an ///M because well, it's an ///M.    Besides, what good is your ///M heritage when a stock 2017 Civic turbo will shred your doors off.  The money is better spent on a new set of wheel bolts.  And while we're at it, don't paint your grill surrounds. It just makes your grills look even tinier, like you are plugging your nose.  Lets also do away with the eyelids.  

5) Stickers

You can buy this stance sticker pack on eBay (source)

This one goes out to all you hard-parkers out there who show up at Ikea meets w/ sagged jeans, flat-billed caps, and dollar-store neon sunglasses.   Yes, the guys who plaster stickers representing crappy tuner brands going down the windshield usually tilted--because tilting gives you extra hardness.  It's a throwback to the 90s ricer area where the stickers were on the fenders straight. Now with stance, the stickers are tilted, and go down the windshield, often including a sticker describing the feeling after eating gas station sushi. Less is more, guys. Nobody's impressed that you threw on a bunch of crappy parts and are offering free advertising.

6) Racks with stickers or stancing

Found example photo on Google

Unused racks with wind deflectors that have stickers on it AND stance?  Get em outta here!  If you have a rack on a tasteful car, without stickers, and it happens to be between outings, fine.  But if your rack is the intended emphasis on your car drawing attention to it with stickers and you have pics of your car w/ a rack on your favorite forum, it should be outlawed.  Looks poor, gives poor mileage, and is a poor visual accessory.  Get a rack to use it to do fun stuff. Nothing more. 

7) Generic or aftermarket low dust brake pads, drilled rotors. Bro brakes!

The stock pads are good enough for 98% of people and drilled rotors are definitely a no go.  BMW Performance are OK in a pinch, but for car shows only.  I wouldn't outlaw them. But bubble-bones low dust, and other aftermarket bro-pads, I would steer clear of as they often cost more and do less than stock. See my full brake write-up here. 

8) Aftermarket body kits, aftermarket wide body

These look poor, especially those by RC Hintzelheimer. Just cause it sounds German doesn't mean it's good.  All it does is make it look like a low quality euro tuner car.  Today, premium for BMW body stuff is stock sport such as MTECH or ///M. Stay away from the gaudy, the wavy stuff, the poor fitting stuff. It's noticeable from a mile away and makes the car difficult to sell because the body is all hacked up.  Hope you plan to own it for life!


9) Cheap/generic HID/Blue bulbs


Poor taste, illegal, poor performing.  Don't do it. 

10)  Wraps


Bad stuff.  Your $300-$3000 is much better spent on new tires and brakes or another safety item.  


Tuesday, September 5, 2017

Go Pro Hero 5 Session Review - The Best Just Got Better

GoPro Hero 5 Session
The Sequel to The Best Action Cam
Photo courtesy of CNET.com

4k @ 30 FPS
1080p @ 60 FPS
 10MP Photo and Video Timelapse
Wifi
Waterproof without Housing up to 33' (up from 30')
Superior USB-C

UNDER CONSTRUCTION -- NEW REVIEW COMING SOON -- For now, See the Old Review of the Session 4 Here!

In the mean time, check out the old go pro 4 hero session. In a nutshell, my preliminary testing shows this new gopro has all the same goodness of the old one, but with superior USB-C, 4k, and better internals for faster boot time and processing.  Much reduced delay!  Buy this new one and sell your old one for $100 and this new one is a no-brainer.

Size and Color

The GoPro Hero 4 Session is without a doubt the lightest and smallest GoPro on the market.  It is absolutely rugged and waterproof without that silly bulky housing you're accustomed to seeing other GoPros in.  This adds a degree of stealth that the larger GoPro Hero 4 Black can't match with its larger size, weight, and even increased dimensions with its waterproof housing it needs.  The GoPro Hero 4 Session weighs in at 74g -- roughly half the weight of the GoPro Hero 4 Black and Silver Editions.  

Another awesome stealth factor is the camera is black.  It doesn't shout "STEAL ME!" as your typical GoPro might.  You can take this bad boy anywhere and nobody would notice.  You can go extra stealth by covering the top LCD screen in a small patch of gaffer's tape (or electrical tape) and disable the red recording LED in front through the settings via the GoPro App on your smart phone.  Lots of customizability here with the app.  This GoPro has virtually all the functionality its bigger more expensive brothers have but in a smaller package.  

Waterproof 

The GoPro Hero 4 Session is waterproof up to 30' without a housing.  I took this GoPro Snorkeling in Thailand and Indonesia and it never skipped a beat.  Simply press the big record button on top and it starts recording.  Hold it down for 3 seconds and it starts taking a timelapse at customizable intervals. Awesome! And the GoPro Editing Software it comes with stitches it all together automatically--voila!  No need for a stinkin' bulky waterproof case!  If you do take it snorkeling or in the ocean, I highly recommend one of those GoPro Flotation Stick things or your GoPro will end up at the bottom of the ocean. 

USB Charging

The GoPro Hero 4 Session charges via Micro USB.  This means no need to carry around a bulky block charger.  And since there's no LCD screen showing a live image when recording, the battery can last long.  I was able to use my GoPro a full day in Thailand taking videos, timelapses, and photos of course being careful to turn it off when not using it (which it automatically senses and does perfectly) Just be careful of accidental presses.  Which is hard because the buttons are pretty meaty and take some deliberate effort to press.  I carried around a portable USB charging battery pack if I ever needed to charge on the fly.  Perfect!

Mountability

The GoPro Hero 4 Session is low profile and in my opinion is much better than your typical GoPro for mounting on a tripod mount suction cup on your car.  Smaller footprint means less drag and also means more stealthy for a low profile appearance.  Much harder to notice a tiny black cube on a single cup suction mount than a large gray rectangle in a waterproof case.  You can also rotate the GoPro Hero 4 Session in its supplied case and the camera will recognize this and record the correct way--all automatically!  It has dual mics for wind noise cancellation.  

Sample Photo:


Chiang Mai, Thailand.  Took this photo very discreetly using my GoPro Hero 4 Session

Sample Videos:

(Cool suspension video)

Biking around Santa Monica

Video driving around (note this recorded  in lower res--oops) 

At half the cost of the larger GoPro Hero 4 Black and GoPro Hero 4 Silver, I think the GoPro Hero 4 Session is a no-brainer @ $199.  

Why you might want The GoPro Hero 4 Black over the GoPro Hero 4 Session?  Very slight edge in image quality when viewing at full res, water resistant at greater depths (130'+), ability to swap batteries, and built in LCD for composing shots.  Also more rugged with the waterproof case attached.  If you break the session's clear glass (though tough) lens cover, you have to replace it whereas with the larger GoPro, you replace the case. So yeah, it's tougher and can go in deeper water. If you're hardcore, go big. 

Recommended accessories:

GoPro tripod mount -- you'll need this if you want to mount your GoPro on a Tripod or Gorilla Pod or anything using a traditional tripod screw mount.  Get it. It's cheap.

GoPro selfie stick -- I don't use this, but you might want to for your family vacation

GoPro helmet mount -- for you bikers out there

GoPro suction cup mount -- for you car enthusiast/track day junkies.  


I hope you enjoyed my review of the GoPro Hero 4 Session. My review of the GoPro Hero 5 Session is coming soon! I appreciate you guys using my links per above--it helps me earn a tiny percentage when you guys make purchases.  Appreciate it!

For inquiries: e46mango@gmail.com